[youtube=http://youtu.be/Mn16CTVcmTo]
 The Martin Luther King Jr. Memorial in Washington, DC has been open to the public for a few months now. After seeing everyone else’s pictures, I finally made it to the Memorial and got a few of my own. I spent about 2 and 1/2 hours there; taking pictures, observing others, and talking to National Park Service (NPS) employees so I could pass along the knowledge you’ll need to have a successful photography excursion to DC’s newest attraction.
I’ll be honest, with the exception of the 30 ft. tall statue of Dr. King that serves as the centerpiece of the Memorial, I didn’t find much that caught my interest. It’s unfortunate, but I think the MLK Memorial will be a second tier destination (for photographers), on the same level as the FDR Memorial. It has plenty of historical significance but limited visual interest. In comparison to DC’s top tier attractions the MLK Memorial is modest. It’s not a Greek god-like temple like the Lincoln Memorial, it’s not an Egyptian god-like obelisk like the Washington Monument, and it’s not a Roman god-like temple like the Jefferson Memorial. While the Memorial may reflect the humble nature of Dr. King (with the possible exception of the 3 story tall statue), humility doesn’t make for visually striking pictures of an American hero.
Photographic Possibilities

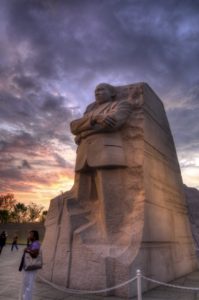
With that said, there are three focal points of the Memorial. The Memorial is a literal interpretation of Dr. King’s analogy that “Out of the mountain of despair, a stone of hope.” So two of the points of interest are the “Mountain of Despair” which serves as the northern entryway to the Memorial, and the “Stone of Hope” which is the block of stone into which Dr. King is carved. The third focal point is the sloping, green marble walls inscribed with some of Dr. King’s inspirational quotes.
")
The Mountain of Despair doesn’t meet the expectations set by hearing the word “mountain.” It is composed of two 30 ft. tall stacks of stone that frame the back side of the Stone of Hope.
")
The quote walls spread out east and west from the Mountain. The westward side slopes toward the Washington Monument. The eastward side slopes toward open sky.
")
As I said earlier, the centerpiece of the Memorial is the Stone of Hope and King statue. The texture and color of the stone is great and held my photographic interest for 90% of the time I was there. It holds most people’s attention and the largest crowds were gathered in front of the statue.
For about 3 weeks in the Spring there’ll be another focal point; the cherry blossoms. To incorporate the Memorial into the landscape of the Tidal Basin, the designers filled it with several dozen cherry trees. These will make for wonderful pictures in late March and early April.
When to Go
It’s still a little early to know when the best times to go are. Like other memorials, the MLK Memorial is open 24 hours a day. I’ve only been there once and I had great success with the light of sunset. You do have to contend with a lot of traffic if you go in the evening though. If you do go at night, I recommend taking tight close-ups of the statue. If you want photos of the full statue, the Mountain of Despair, or the quote walls, you will definitely want to get there in the morning, likely around sunrise. I haven’t seen how it is lit at night but that could open another possibility. Most memorials are beautifully lit.
What to Bring
 Lens: I recommend a lens that can handle a range of focal lengths, at least from 18-135 mm. I took the majority of my pictures with an 18-200 mm lens and most of those were at 35mm’s or greater to ensure I didn’t get the tops of people’s heads in the picture. In order to include more of the beautiful sunset lit sky I used an 11-16 mm lens for several pictures. While it made it more difficult to avoid the people, the crowds will eventually subside making it possible to take wider angle shots…it’s just not practical now. The quote walls and Mountain of Despair can easily be captured with focal lengths between 18 and 135 mm.
Tripod: Bring your tripod for sunrise, sunset, and HDR photos. This has been a complicated issue for me to figure out and report on. The Memorial is new and there is still some confusion amongst the rangers about the rules. I went when it first open and was told that having tripods was fine so long as it wasn’t busy or causing a tripping hazard. I went again during the winter of 2011-2012 and was told that I need to pack it up. I went back recently and saw a tripod set up so asked a ranger and was told that tripods are allowed. He said that the ranger who told me it wasn’t allowed is mistaken. So my advice is bring a tripod and use it if you feel you need it. Be cognizant of where you set it up. Try to stay out of high traffic areas.
What’s Nearby

While the Memorial is not close to a Metro, it is in the midst of a number of attractions on the west end of the National Mall. You’ll have no trouble making the most out of the walk to the Memorial. Spend a day exploring the Tidal Basin and the War Memorials.
That’s a quick review based on only one trip. As time goes by, I’ll have more experiences and pictures to share. As I do, I will add entries to this blog. If you have any questions you would like answered enter them into the comments below. If you would like to share your pictures enter the URL in the comments.
I hope you enjoy DC’s newest treasure and walk away with some amazing pictures to hang on your walls.
Summary
What: The Martin Luther King Jr. Memorial
Where: West End of the National Mall in Washington, DC
When: Sunrise and Sunset for the best light
——————————————————————————–
Lens: Zoom lens (18-200 mm)
Tripod: Bring It
Flash: Don’t Bring It
Pingback: Photographic Opportunity – The Martin Luther King Memorial Dedication « PhotoTourism DC
Pingback: Photographing the Jefferson Memorial « PhotoTourism DC
Pingback: Photographing Cherry Blossoms in Washington, DC « PhotoTourism DC
Pingback: Photographing the DC World War I Memorial « PhotoTourism DC
Pingback: Photographing the Washington Monument « PhotoTourism DC
Pingback: Photographing the Jefferson Memorial | brandonkopp.com
Pingback: Photographing Cherry Blossoms in Washington, DC | brandonkopp.com
Pingback: Photographing the DC World War I Memorial | brandonkopp.com