I am embarrassed to say that I “used” a polarizing filter for years without the first clue how to actually use it. In my early days of photography, I bought some books on general photography principles. In those books, I read about polarizing filters and how they cut down on reflections and make green plants look greener and blue skies look bluer. As an aspiring landscape photographer, this sounded very appealing to me, so when I bought my first camera that accepts filters (a Sony Cybershot DSC-F828) I made sure to order a circular polarizer. From that moment on, whenever I saw a scene that included green or blue, I slapped it on and started snapping photos.
Fast forward several years and I’m reading an Outdoor Photographer article about photographing Fall colors. In that article, the author describes how you have to rotate the filter to the right orientation in order for it to block light coming from certain angles. Somehow, I missed that in my earlier reading. My own, internal sense of embarrassment hit me square in the face. Nobody else knew that I’d just been throwing the filter on my camera any which way and assuming it was working, but I knew and that was bad enough.
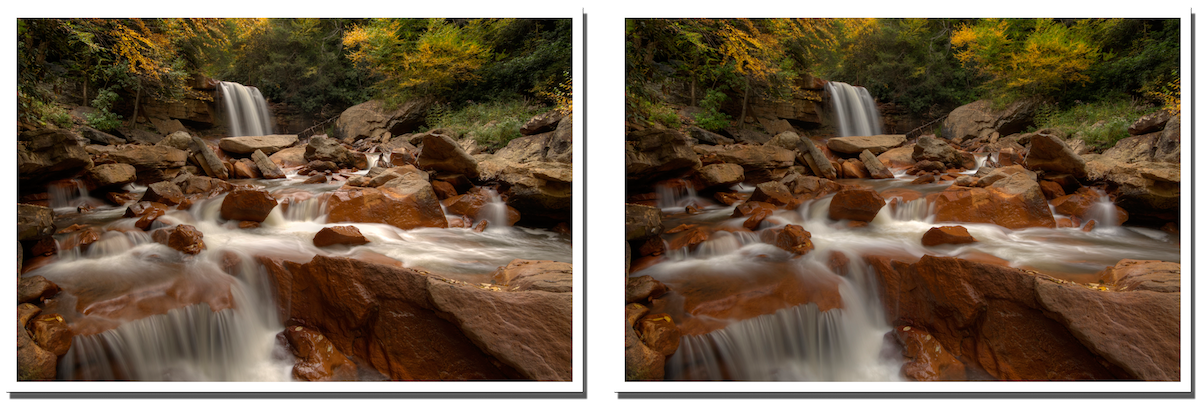
I went back and looked at some of my photos where I remembered using the filter. In some of them, it appeared that the filter had serendipitously wound up at the right orientation (below left). In others, it appeared that the polarizer served only to lengthen my shutter speed, resulting in a blurry photo (below right).

I read more about how polarizing filters work. I found a basic understanding of the principle helpful in using the filter, so let me try to pass along what I learned in as simple and visual a way as possible. What I’m about to write probably wouldn’t get me an “A” in physics class, but it gets (hopefully the correct) point across.
How A Polarizing Filter Works
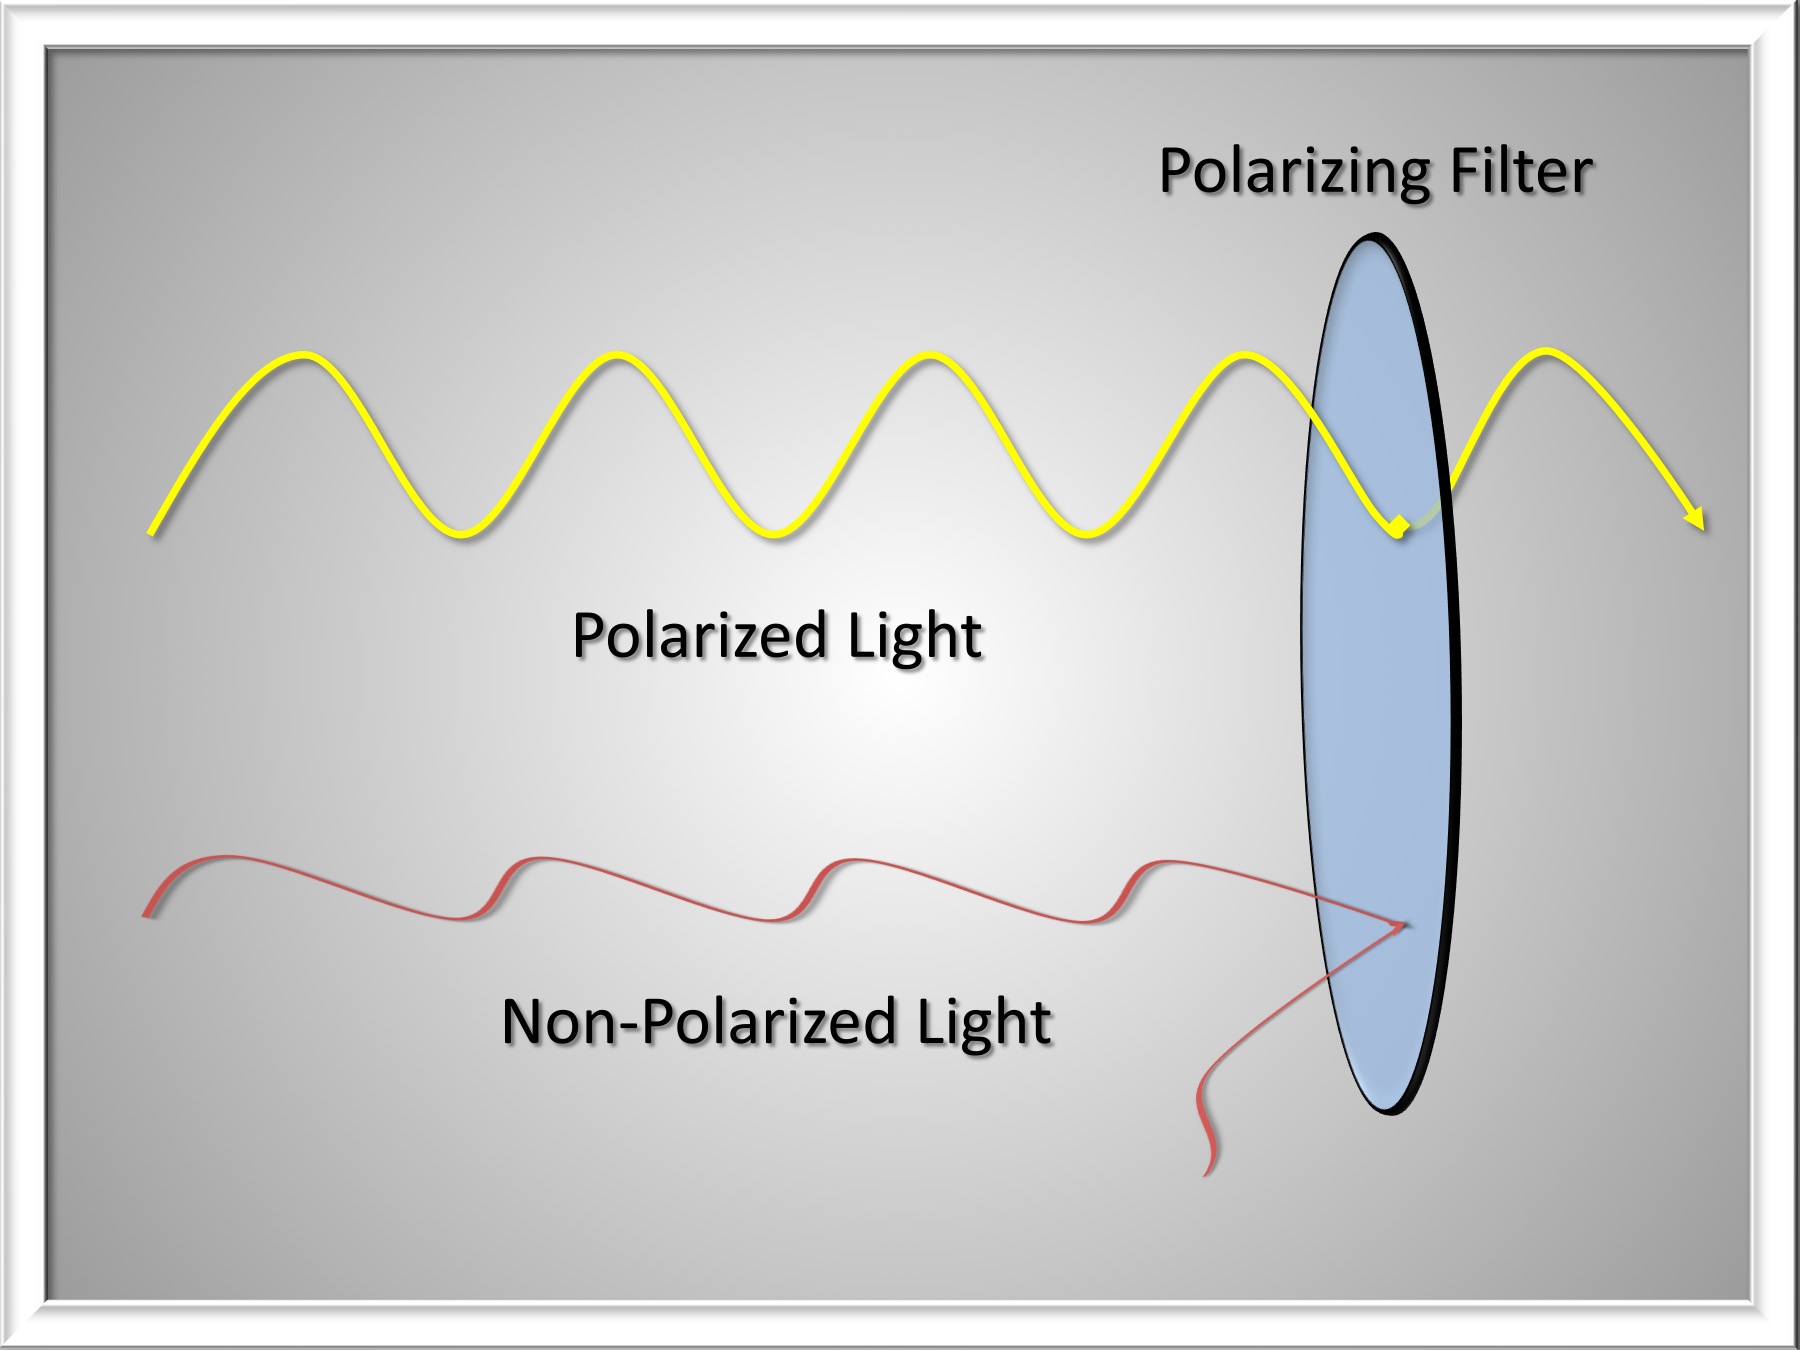
Light travels in waves (and as a particle for all of you physics nerds out there) but those waves don’t just move up and down. Sometimes they travel side-to-side or somewhere in between. The problem of thinking of a wave as oscillating up and down or left and right is “up and down” relative to what? “Left and right” relative to what? Think of a beam of light as traveling along a plane represented by the blue arrow in Figure 1 or by the Z-axis in Figure 2. Light travels up and down (along the Y-axis) relative to that plane and light travels left and right (along the X-axis) relative to that plane.
NOTE: In all of the diagrams, I use colored lines to denote the difference between Y-polarized light waves and the ones that are X-polarized. The colors of the lines are not meant to denote the color (i.e., the wavelength) of the light.
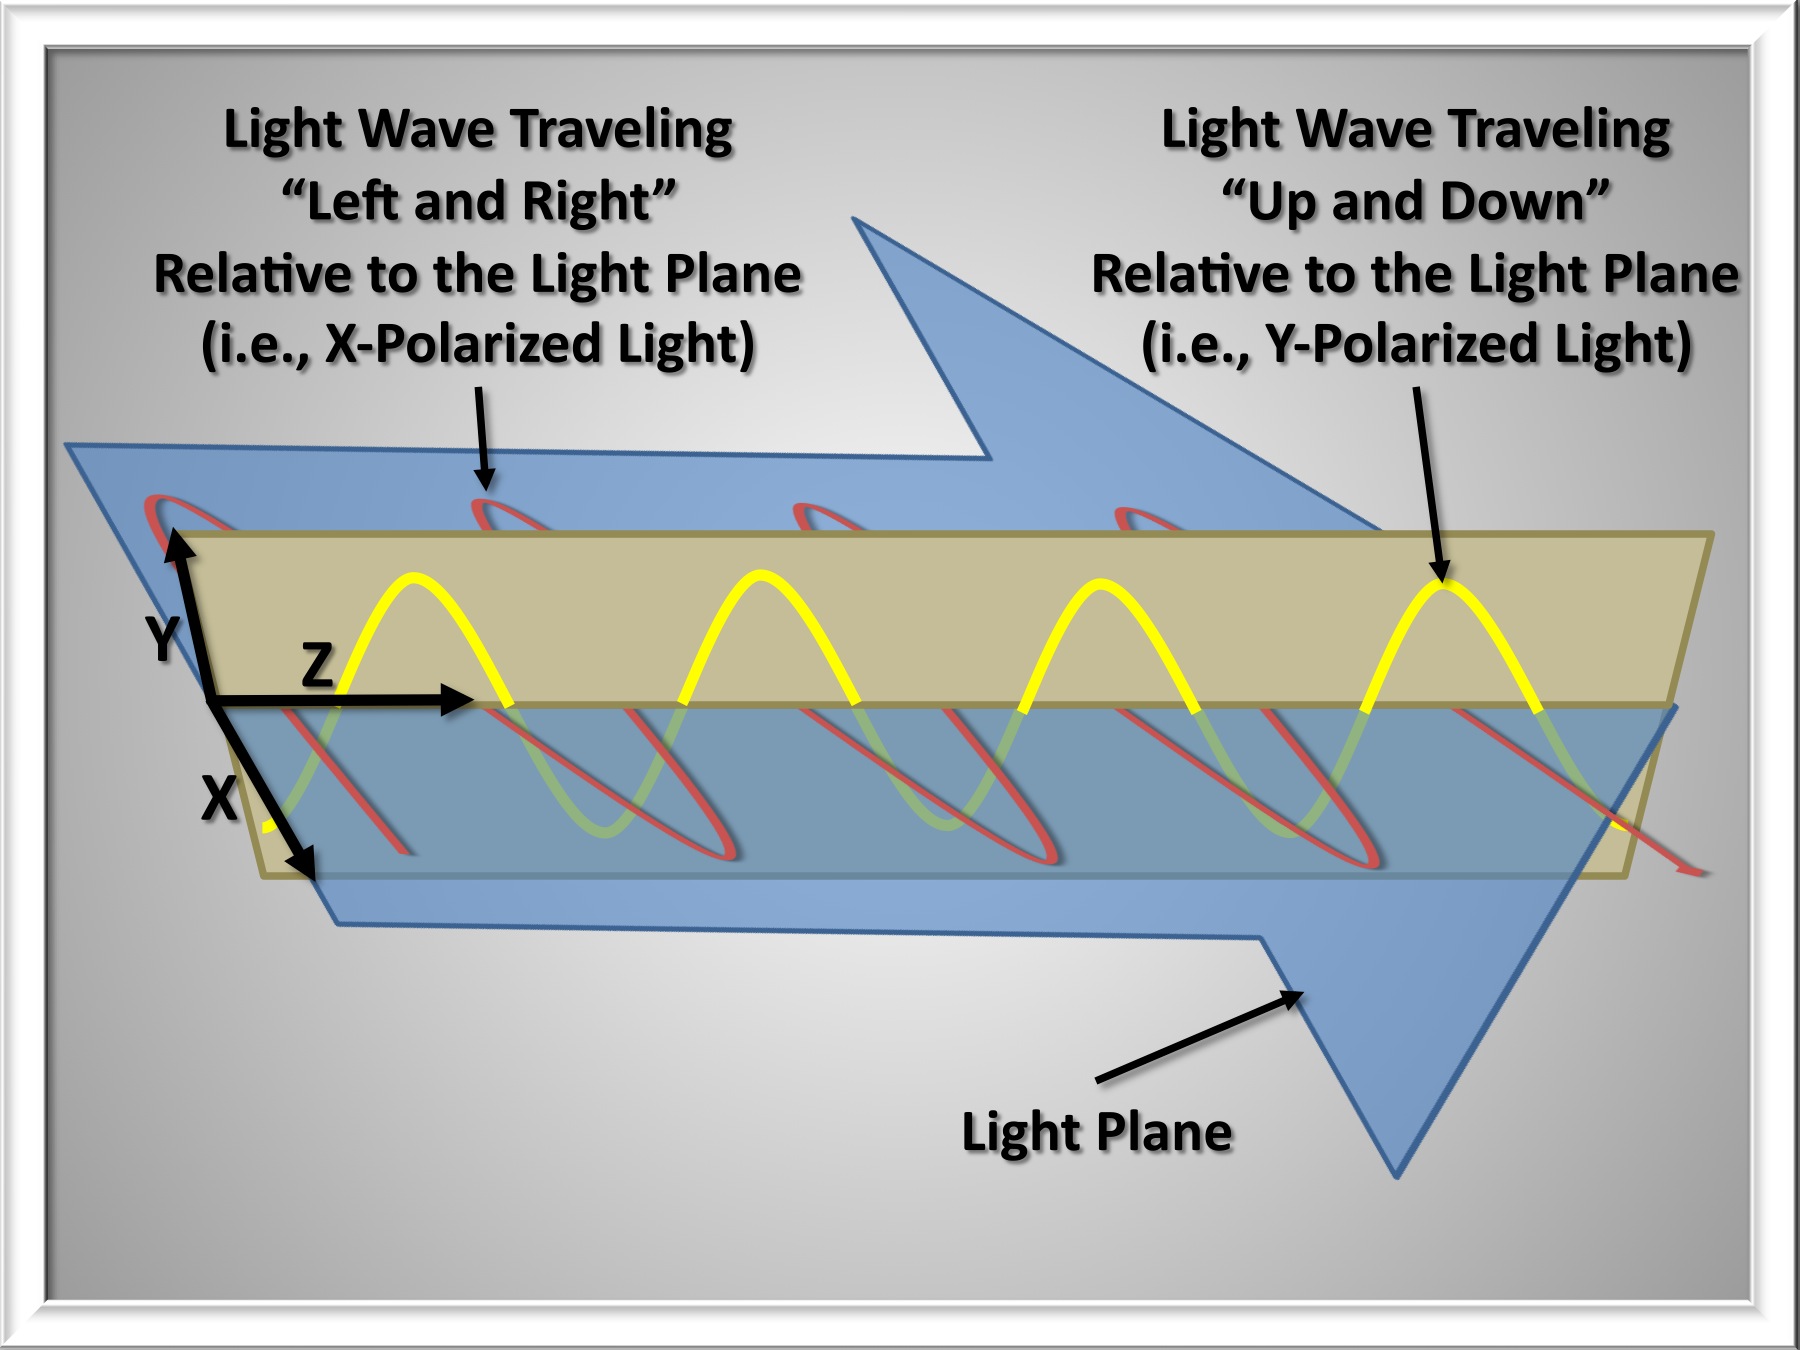
If we say that waves oscillating up and down (along the Y-axis) are polarized, then light waves oscillating left and right (or anything other than up and down) along that same plane would not be polarized. We could just as easily say that light oscillating left and right (along the X-axis) is polarized, in which case light oscillating up and down would be non-polarized. For the sake of ease, throughout the rest of this post, I am going to refer to light oscillating up and down relative to a light plane as “Y-polarized,” to light traveling left and right relative to the light plane as “X-polarized,” and all other orientations of light as non-polarized.
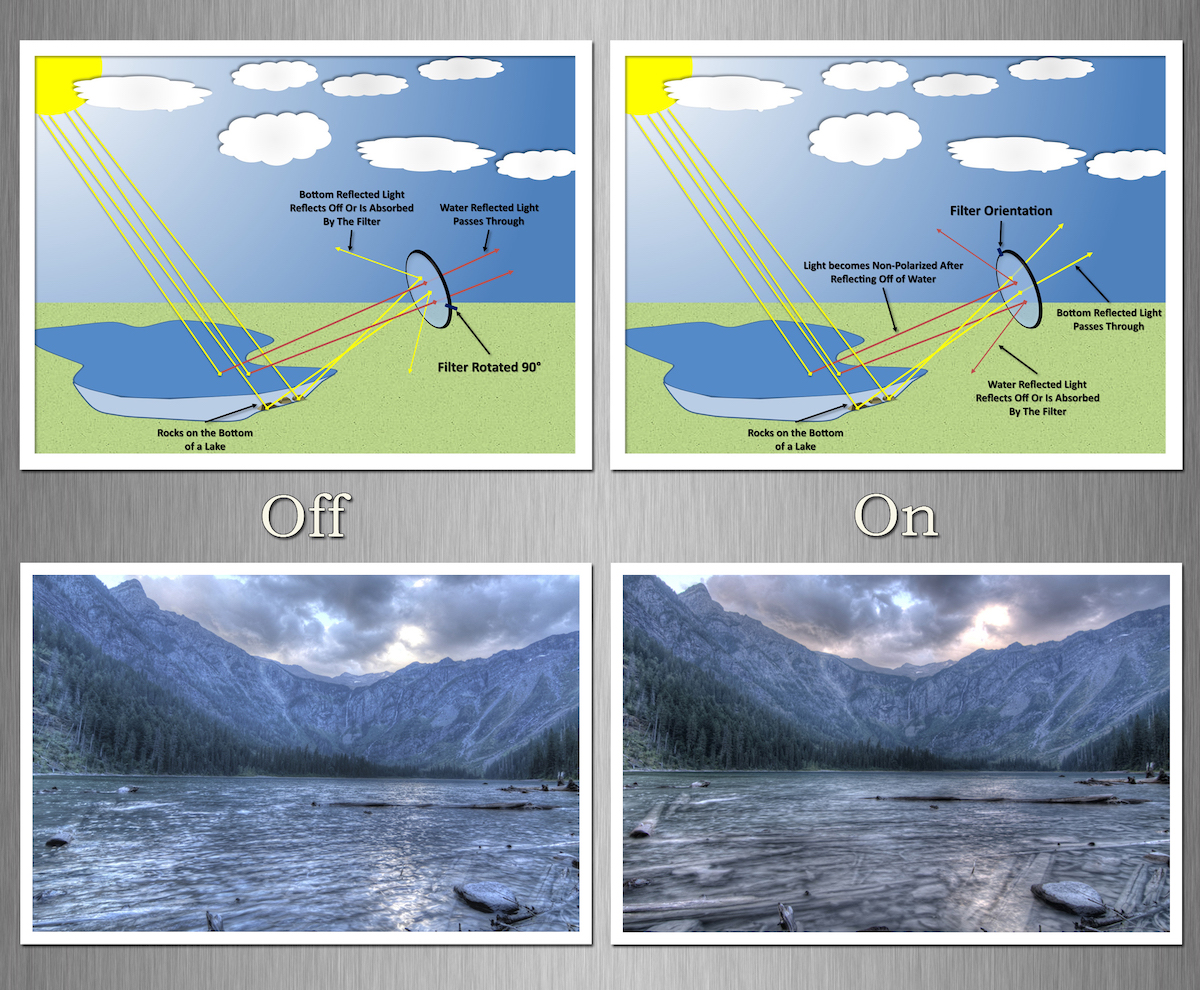
As light hits the surface of water or a shiny, non-metallic object, it becomes polarized; that is, all (or most) of the reflected rays of light end up oscillating in the same direction. In the top panel of Figure 3, as Y-polarized light beams hit the water, they become X-polarized. This would be true for light oscillating at other orientations too; once it hits the surface of the water it would become X-polarized. This is different than if light rays reflect off a non-shiny surface. In that situation, the light rays that are not absorbed by the object would reflect and continue oscillating along the same plane (see the bottom panel of Figure 3).

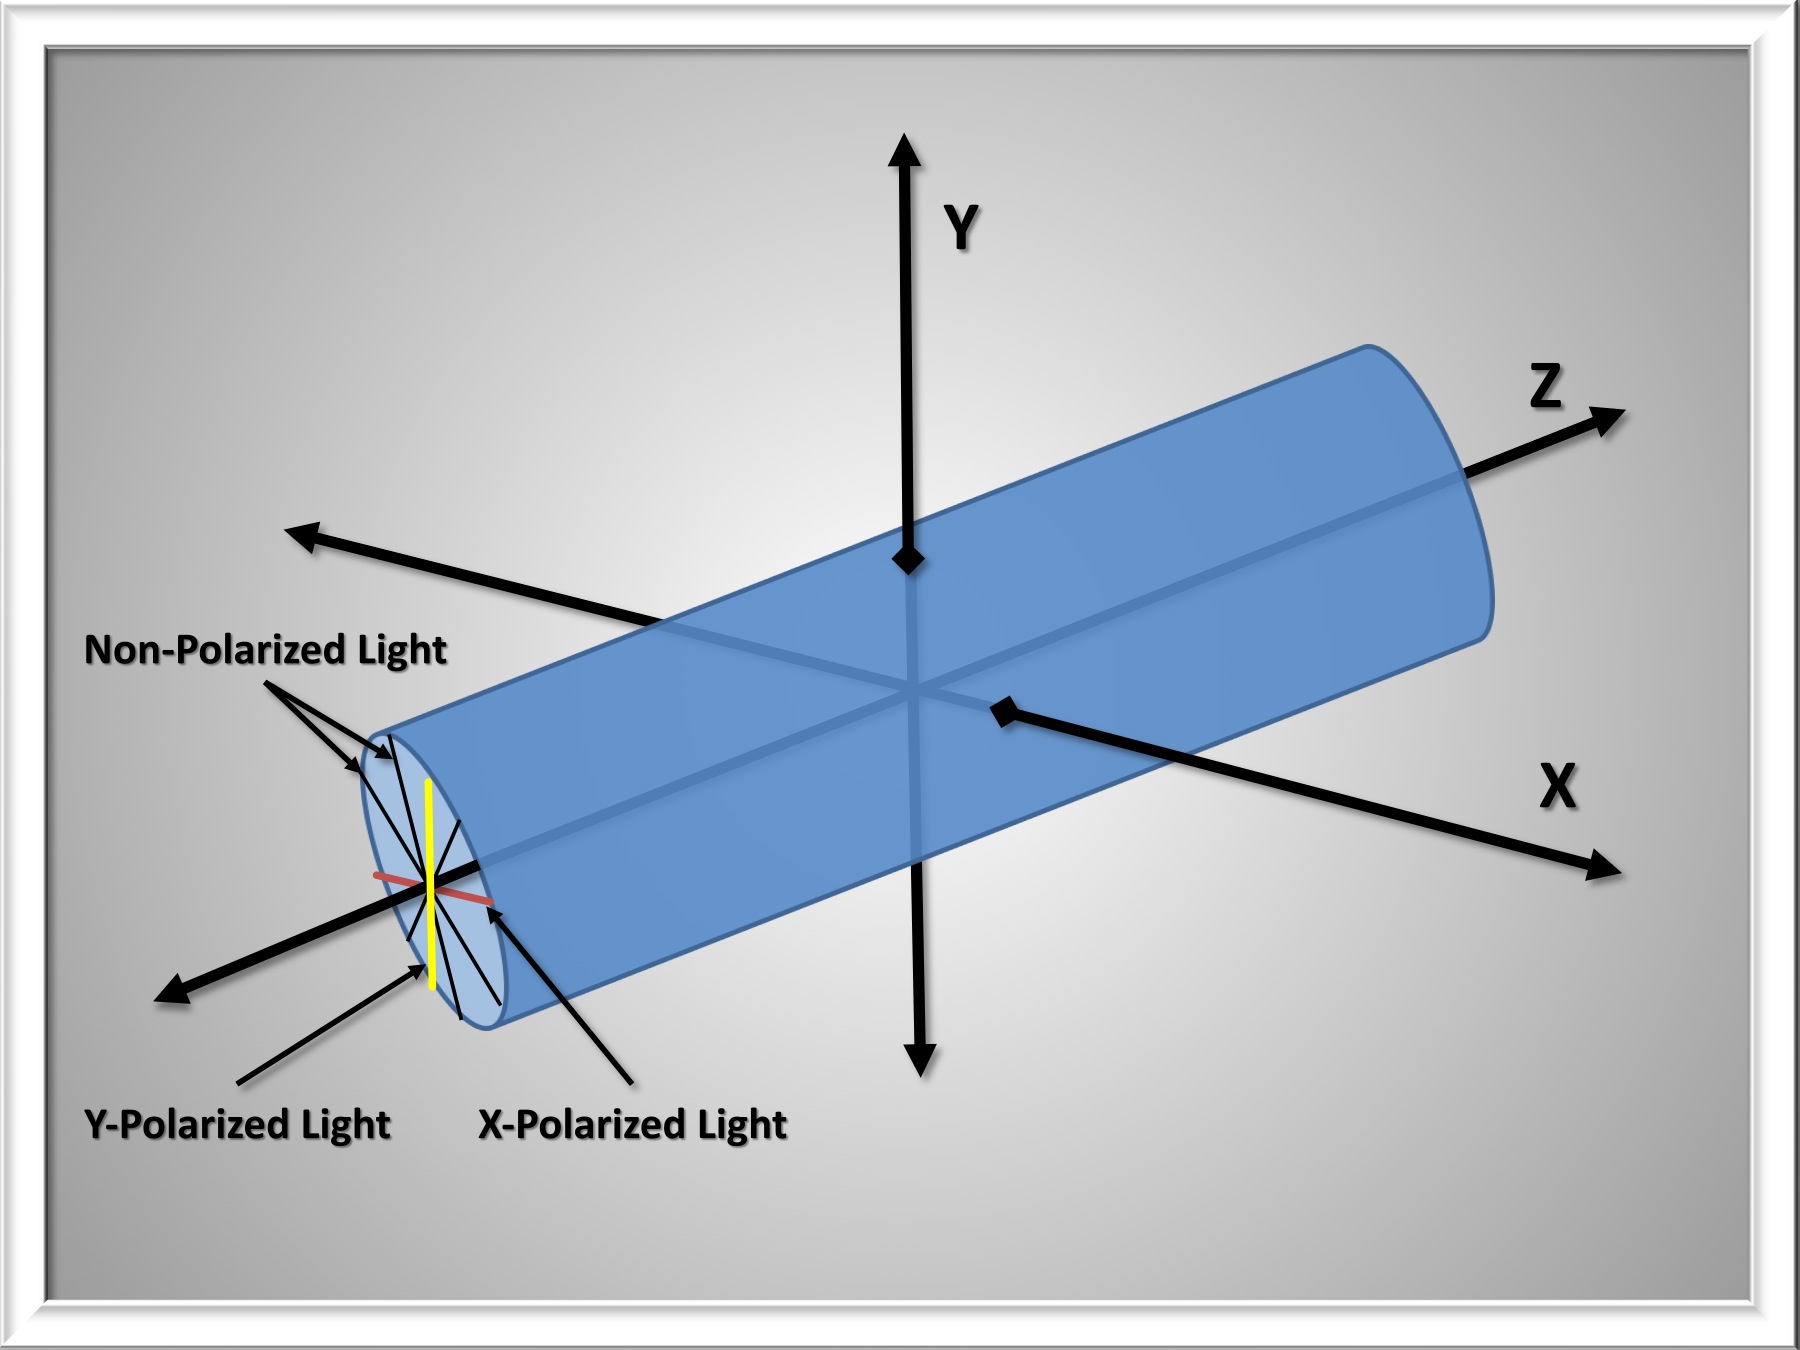
When the polarizing filter is set for Y-polarized light, it stops non-polarized light rays from passing through, leaving only the Y-polarized light (see Figure 4).
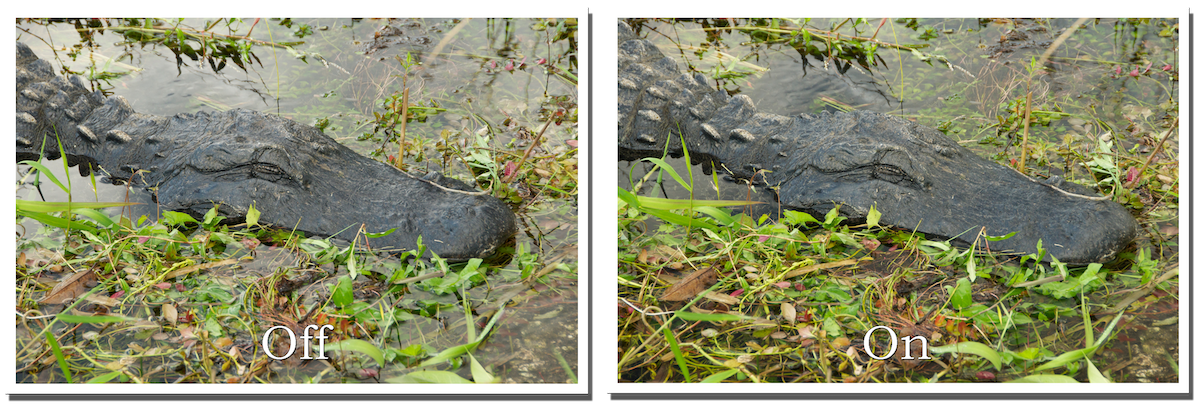
“On” and “Off”
In the matched photos below, the polarizing filter remained on for both pictures only the orientation changed. This is what I mean by “On” and “Off.”
- Off – the reflected, X-polarized light is visible in the photo.
- On – the reflection is suppressed by the filter and Y-polarized light is visible in the photo.
As I said earlier, light waves are polarized relative to some plane of light, but the polarizing filter doesn’t know what “up and down” or “left and right” are. You have to “tell” the filter what polarized means, and that’s where rotation of the filter comes in. As you spin the filter, the light that is considered polarized changes. With the filter set at one orientation, only Y-polarized light waves are considered polarized and so those are the ones that end up making it to your camera’s sensor. If you turn the filter 90° then, relative to the filter, the X-polarized light waves are polarized and are able to pass through. So in essence you can choose to see, or not see, the reflected light.In Figure 5 and other photos that follow, I illustrate this concept with photos that say “On” and “Off.” In the “Off” photos, the polarizer is still on the camera, it is just adjusted to allow in the reflected, X-polarized light. In the “On” photos, the filter is reoriented so that X-polarized light (and any other non-polarized orientation of light) is filtered out and Y-polarized light enters the camera. You can see in the On picture in Figure 5, that light reflected off rocks and tree limbs at the bottom of the lake makes it to the camera’s sensor, whereas in the Off picture you see the reflection.
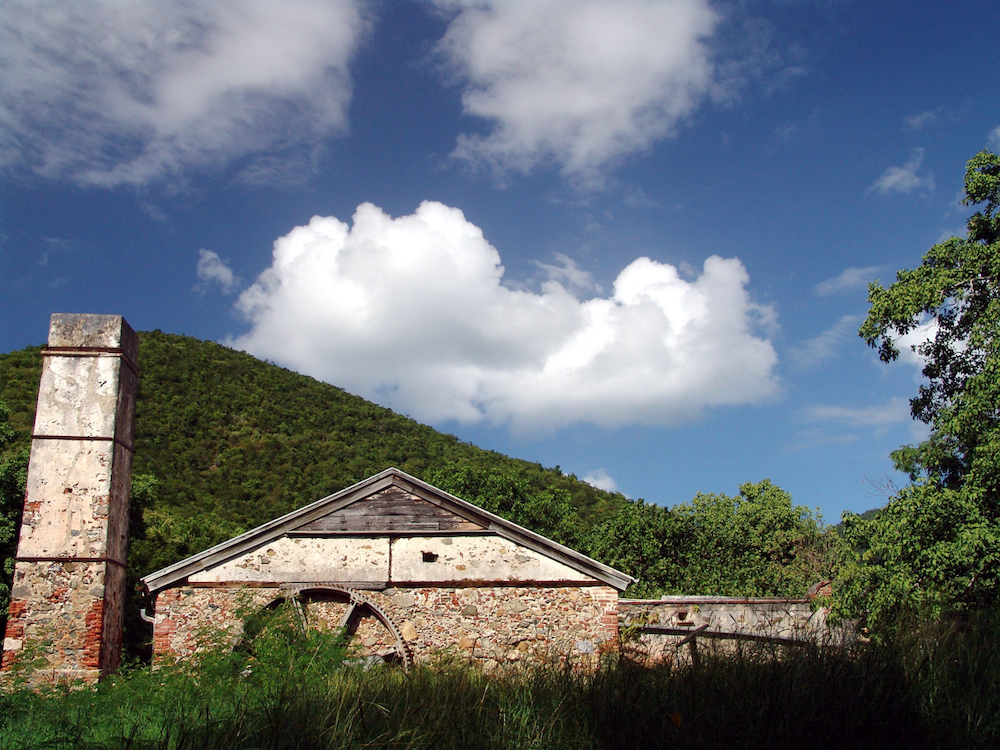
Circular and Linear PolarizersThroughout this article, I talk about polarizing filters generally, but there are different varieties. There are linear and circular polarizers. Both types work roughly how I described above. Circular polarizers take an additional step that further alters the oscillation of the light wave before it passes into the camera. To be honest, I didn’t understand much of what I read so I chose not to include any additional drawings or explanation. Suffice it to say that Circular Polarizers > Linear Polarizers, especially if you have a newer model of camera (e.g., if it has Live View). I used a circular polarizer to take all of the photos in this article.With this newly acquired knowledge, I set out to experiment. I took a few preliminary photos but didn’t really start using the polarizer until two recent trips; to Glacier and to Everglades National Parks. I generally try to get photos during the golden hours around sunrise and sunset, but there is A LOT of time to fill during the day when you’re on vacation. During those days I was out taking photos, I occasionally had beautiful, light-diffusing clouds but most of the time the sun was oppressive. Haze obscured beautiful vistas and harsh reflections made photos of lakes and rivers unviewable. The polarizer saved a lot of my pictures on those trips. Through this experimentation, I’ve learned a lot about when filters will help and when they won’t and how to get the most out of them. I want to pass this knowledge along. Maybe I can keep you from making the same mistakes I did, or at least help you feel less embarrassed when you encounter a similar situation. What I’ve Learned
- Choosing when to use it: Figuring out when a polarizer is going to help and when it’s just going to get in the way is probably the most important lesson I’ve learned. Here are a few instances when one can help.
- Bodies of Water – If you’re out during the day, watery reflections can turn a blue lake into a sea of white. A polarizing filter can cut down on the reflection.
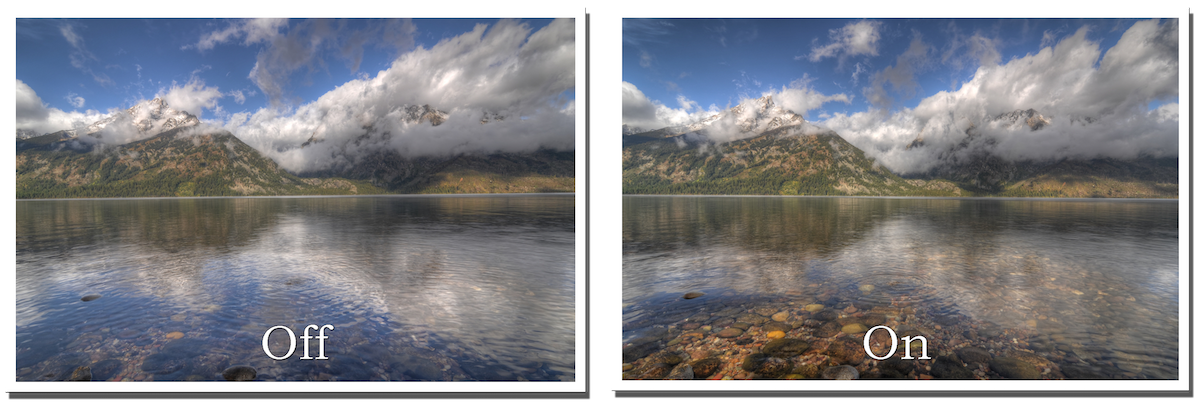
Jenny Lake, Grand Teton National Park - Near Bodies of Water – I love taking photos of waterfalls and the area surrounding waterfalls is (not surprisingly) wet. In those conditions a polarizer can help soften reflections so the viewer can concentrate on what’s most important.
-
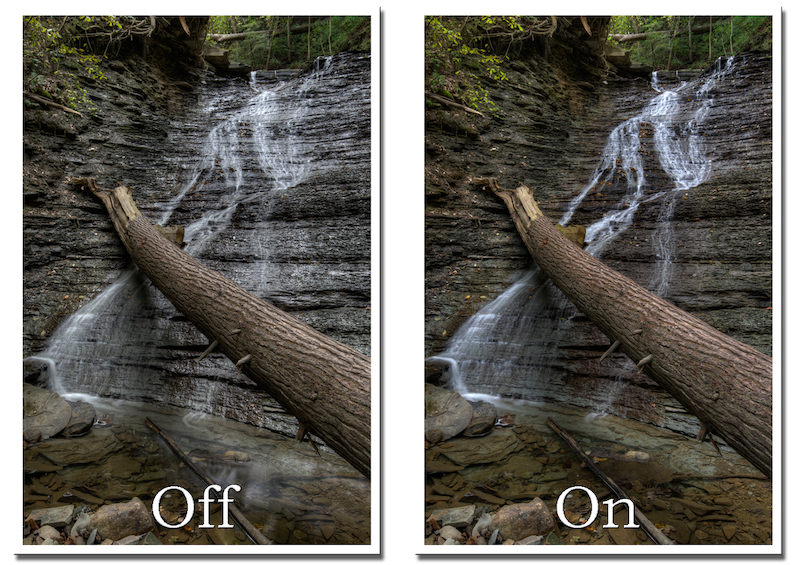
Buttermilk Falls, Cuyahoga Valley National Park - Leaves – This is the lesson I learned from the Outdoor Photographer article. Leaves might not seem like a highly reflective surface, but the surface coating on leaves that seals them from water can be shiny. Also, water or dew can pool on a leaf leading to water-reflected light. Using a polarizing filter in this situation can help prevent blown-out bits in your photo.
- Hazy Conditions – When light is passing through the air it hits water, dust, and other particles in the air. The result is a white, hazy effect. These reflections can also be diminished using a polarizing filter. See Lesson #5 below for additional information.
- Windows – When taking photos through glass (e.g., a case at a museum or through a car window) ambient reflections can obscure the subject. Similarly, when taking photos of the exterior of a building, bright reflections can be distracting. A polarizer can help limit the distractions.
- People – As much as I hate to admit it, I have a shiny face; it happens to the best of us. You can use a polarizer to help bring skin tone out through reflections.
- Animals – Animals, especially those near the water have reflective fur, feathers, and scales.
- You have to rotate: I already mentioned this very important lesson. In order for the filter to be effective you have to rotate it to “dial in” which orientation of light you want. Do you want the Y-polarized light, the X-polarized light, or something in between? It seemed weird to me at first that rotating an outwardly uniform piece of glass should make any difference, but it definitely does.
- Watch your white balance (WB): If you’re the type of person who likes to work all of your camera settings manually, then you’ll want to pay attention to WB when you have a polarizing filter on. The software written into your camera to correct for the temperature of light when you set WB to sunny or cloudy does not account for the fact that the light will be passing through a piece of bluish glass. I almost always photograph with Auto-WB when I have the polarizer on. If it’s necessary to set WB manually, I will take a test photo, review it, and adjust the WB accordingly.
- Watch your shutter speed: I didn’t realize it when I first started using a polarizer, but you lose about 2-stops worth of light. Remember that the filter is reflecting or absorbing the non-polarized light, so very little of that is making it to the sensor. If you’re photographing handheld, this could be the difference between a sharp 1/60s shutter speed and a blurry 1/15s one.
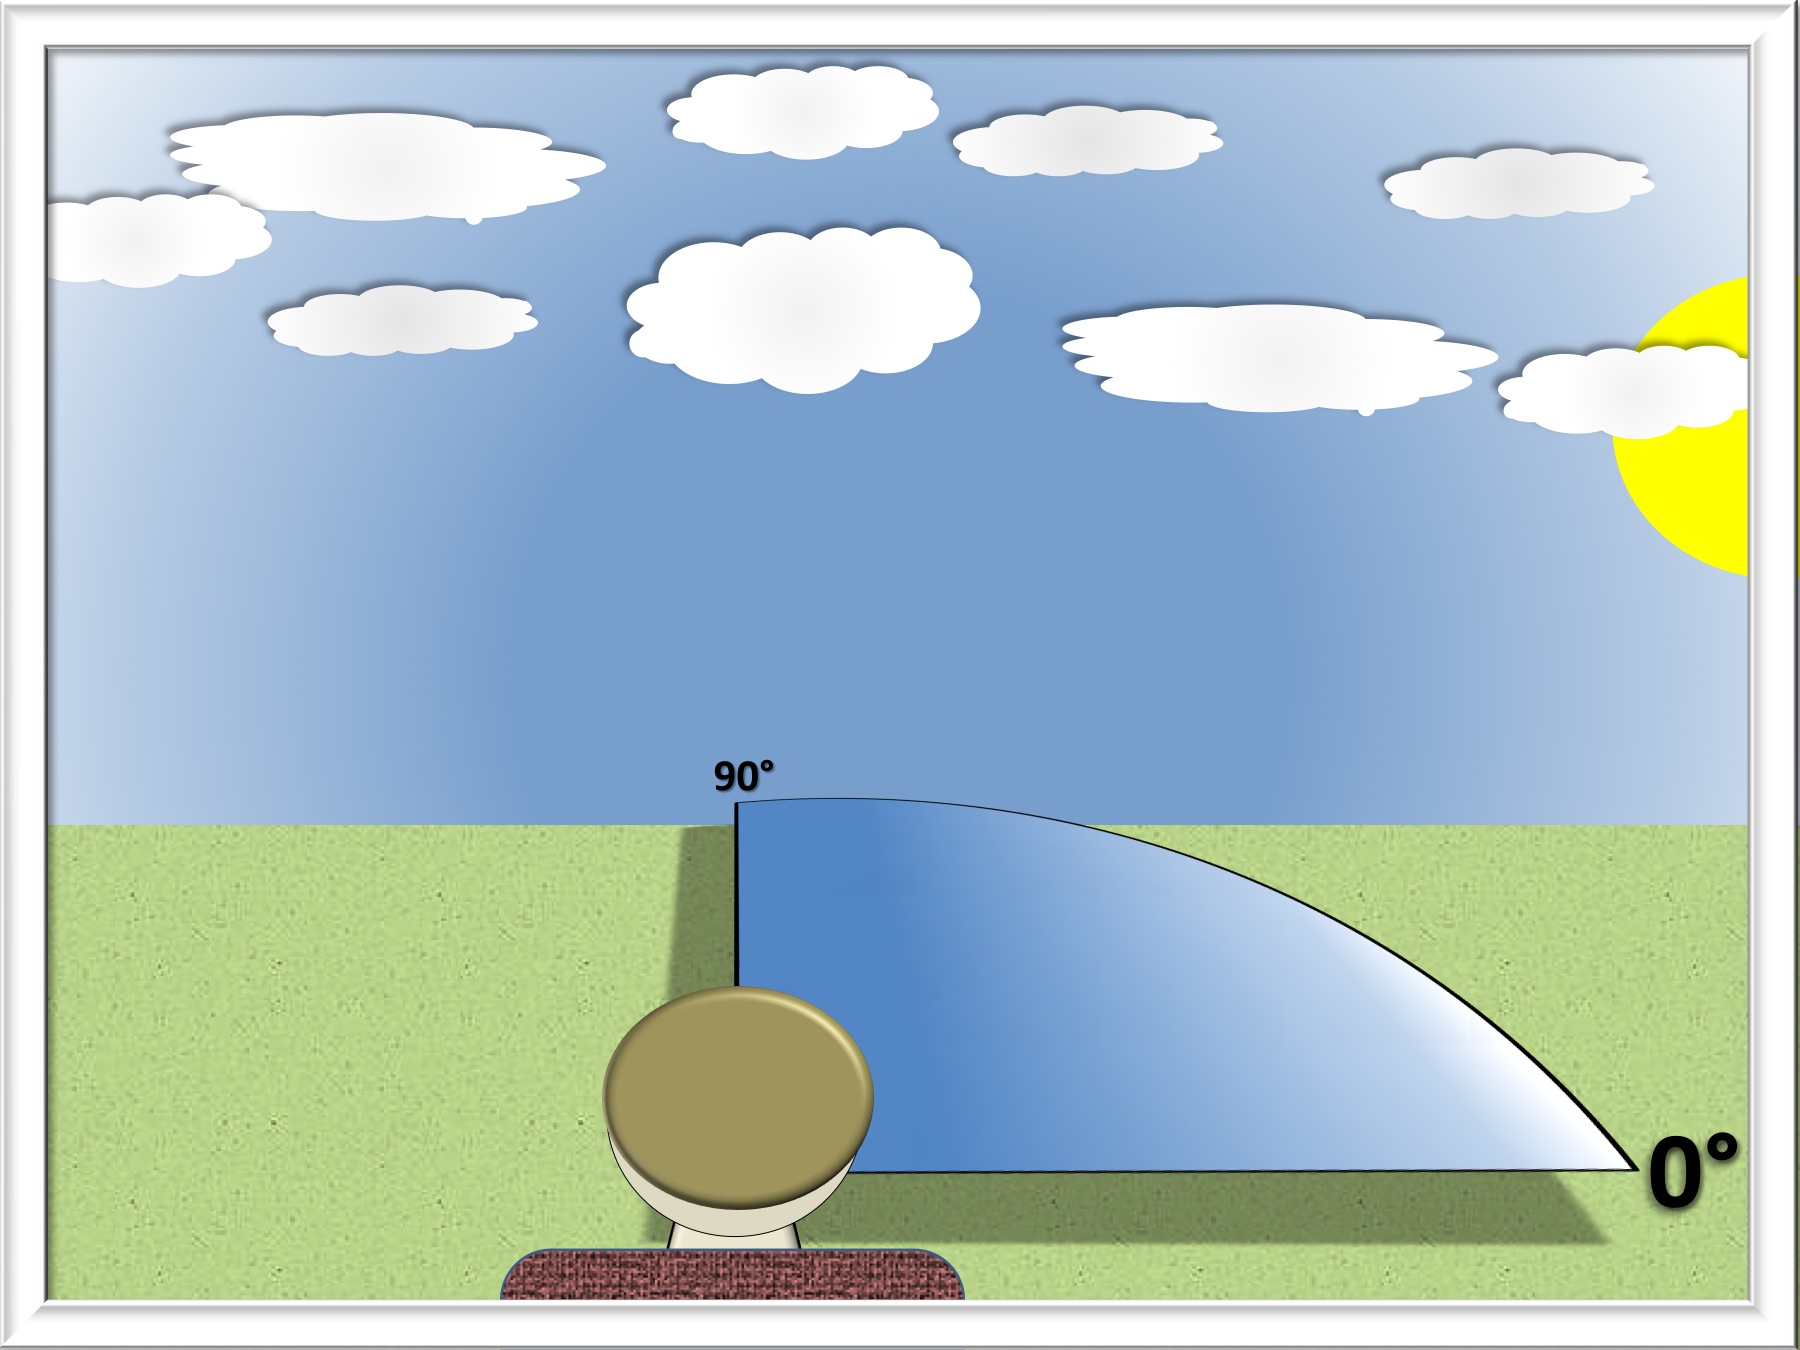
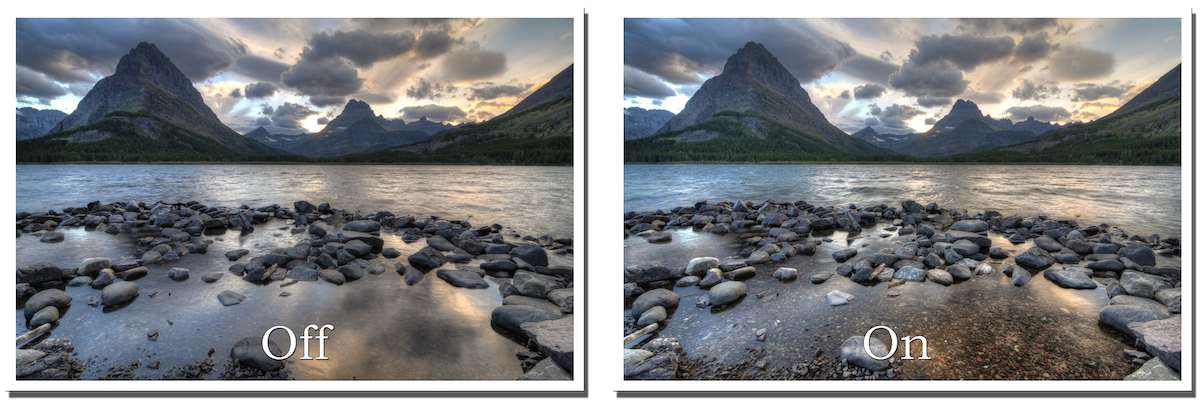
- Where’s the sun: One major reason that people use polarizing filters is because they can bring out the blue in the sky. In order to make the most out of this effect, you should pay attention to what direction your photographing relative to the sun. Ideally, you want to be turned 90° from the sun; that is, you want to sun to be to your left or right. There is a physical explanation for this having to do with how light is scattered by molecules in the air, but I’ll leave you with the cutsie drawing below. Just below that is a set of photos I took in Glacier National Park. Notice how deeply blue the sky is in the “Off” picture. There the polarizing filter is letting through only the Y-polarized light coming from the sky and reflecting the non-polarized light that was reflected from airborne water particles. You can tell from the shadows that I am turned 90° away from the sun.
- Sometimes you want the reflections: I love watery reflections. Sometimes they are the sole reason I’m taking a picture. In that case, I am sure to leave the polarizer in my bag or adjust it to an orientation that still brings the reflection through. I don’t know which one of the photos below I prefer. The polarizer gives you some versatility in your photo selection.
Some Additional Inspiration:
- My Flickr Gallery – Take a look through my photos and add me as a contact.
- Mike Condron – A great technical explanation, with very few pictures.
- Science for the Curious Photographer on Amazon.com – Ridiculously complicated explanations of a number of phenomena of interest to photographers. I don’t know how it got so expensive.
If you have any questions let me know using my CONTACT FORM.
Pingback: Everglades National Park – brandonkopp.com
Pingback: Everglades National Park | brandonkopp.com
Pingback: Everglades National Park | brandonkopp.com