When I got my first DSLR, I got an 18-200mm lens with it. It didn’t take me long to realize that the wide-angle 18mm wasn’t wide enough for everything I wanted to do. So I did what any novice photographer would do, I bought more equipment; specifically an 11-16mm lens. Even then, the photos didn’t look the way I imagined. 4 X 6 and 8 X 10 formats were great for most situations, but they didn’t convey the drama and size of landscapes or buildings as they existed in my mind. I was thinking of panoramas.
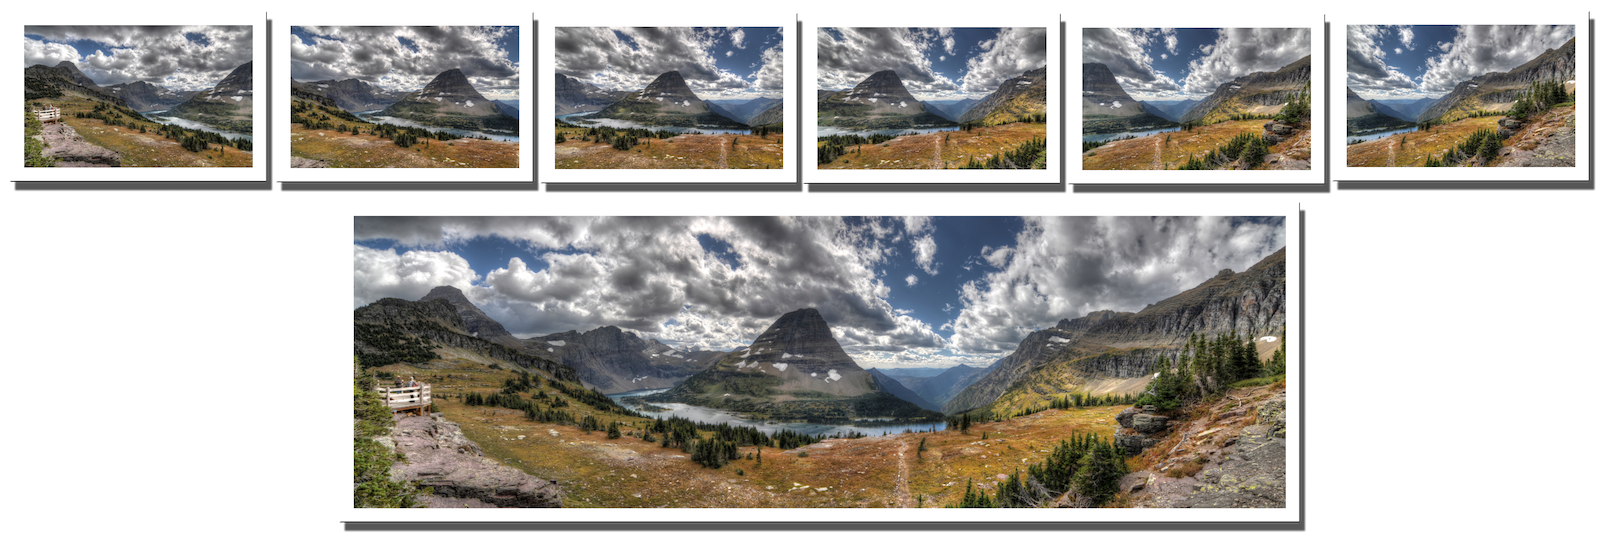
My first attempts at panoramas were clumsy. I’d take a really wide-angle shot at, say, 11mm and then crop the photo so only a narrow band remained in the middle. It was a little while longer before I learned there are programs that will take multiple photos, match up the areas each photo has in common, and spit out a panorama; a process known as panoramic stitching. I then started to take REALLY wide panoramas without concern for the final dimensions (see the 4.9 X 1 panorama below). Then, finally, I became wise to standard print sizes and started cropping my photos accordingly.

Workflow
Take the Photos
There are A LOT of things you need to be simultaneously thinking about when taking your photos.
When taking your photos, be sure that:
- Your Photos Follow a Straight Line – The photos that make up your panorama need to follow a straight, horizontal (or vertical) line. If they don’t, you will find yourself cutting out key elements of your photo when making the final crop.
- Use Natural Lines – If the scene offers you a straight line, the horizon for example, you can follow that or try to use it as a reference and keep the center of your frame a constant distance above or below that line. Remember your rule of thirds, you probably don’t want the horizon running directly through the center of your photo. This can also be fixed later when cropping the image.
- Tripod – A tripod can also help you transition your camera along a stable line. Make sure the tripod is level and that your camera doesn’t tilt as it moves across the scene.
- The Whole Scene Fits – After you select your scene, you should look through your viewfinder and transition your camera through the whole range of the panorama before taking any photos. By doing this you make sure that important elements won’t be out of frame at the top or bottom of your photo. You also want to leave extra room at the margins of your photos. Through the editing process you’ll end up having to crop off areas at the top, bottom, left, and right to get a rectangular composition. Make sure that there’s a little padding so nothing important has to be cropped out.
- The Pictures All Look the Same – You are creating one image from multiple photos, so make sure that all the photos look the same. In many circumstances, using automatic settings will work fine. However, if you’re transitioning through a range of lighting situations, your photos will vary in terms of brightness or color balance. This difference becomes noticeable when the pictures are all combined (see the photo below for an example).
- Use Aperture Priority Settings – I usually set a small aperture to ensure as much of the scene is in focus as possible. This has worked well for me.
- Set a Constant White Balance
- Focus – I still use automatic focus. I want the whole scene, near and far, to be in focus. Experiment with this.
- Batch Edit When Making Adjustments – I usually combine my photos and then make any color or exposure corrections to the full panorama. If you do want to adjust the photos first, be sure you make the exact same change to each one.
- HDR or not HDR? – I am a fan of HDR. I use it for most of my work. Making a panorama from HDR files is just like any other set of files; just be sure that when you are processing the HDR photos, you use the exact same settings for all of them.

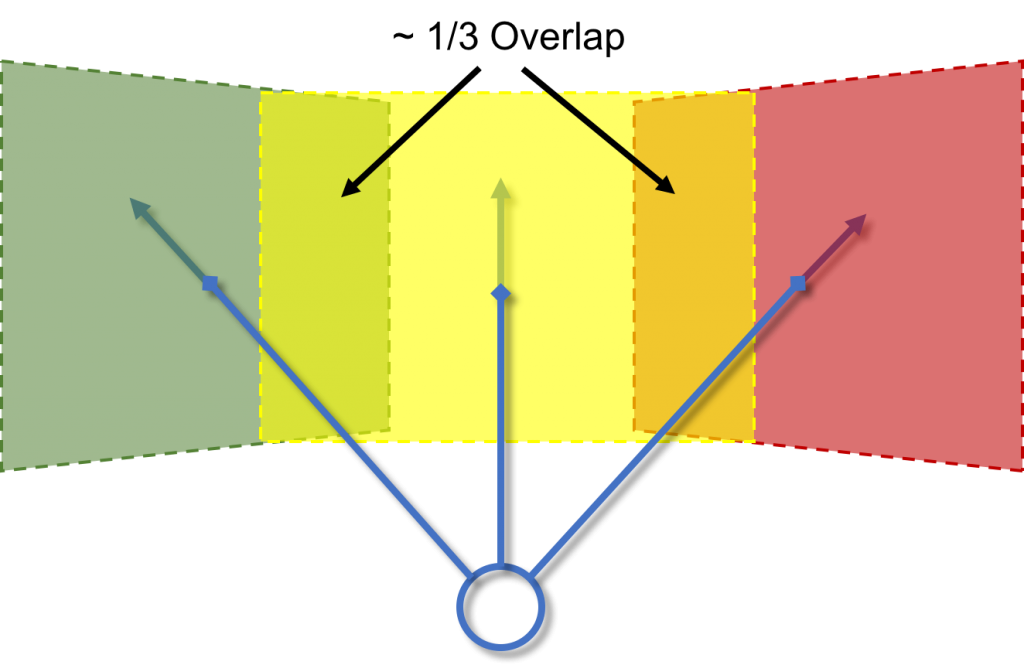
- Your Photos Overlap – In order for the stitching function to do it’s thing, your photos have to overlap. Ideally, you want 1/3 overlap between your photos. After you take a photo, pick a spot to move your cameras focal point before transitioning. Aside from processing time, there’s no drawback to taking and stitching more photos, so I often overlap more than 1/3. In the example below, I show you how, sometimes, I overlap much more than is necessary.
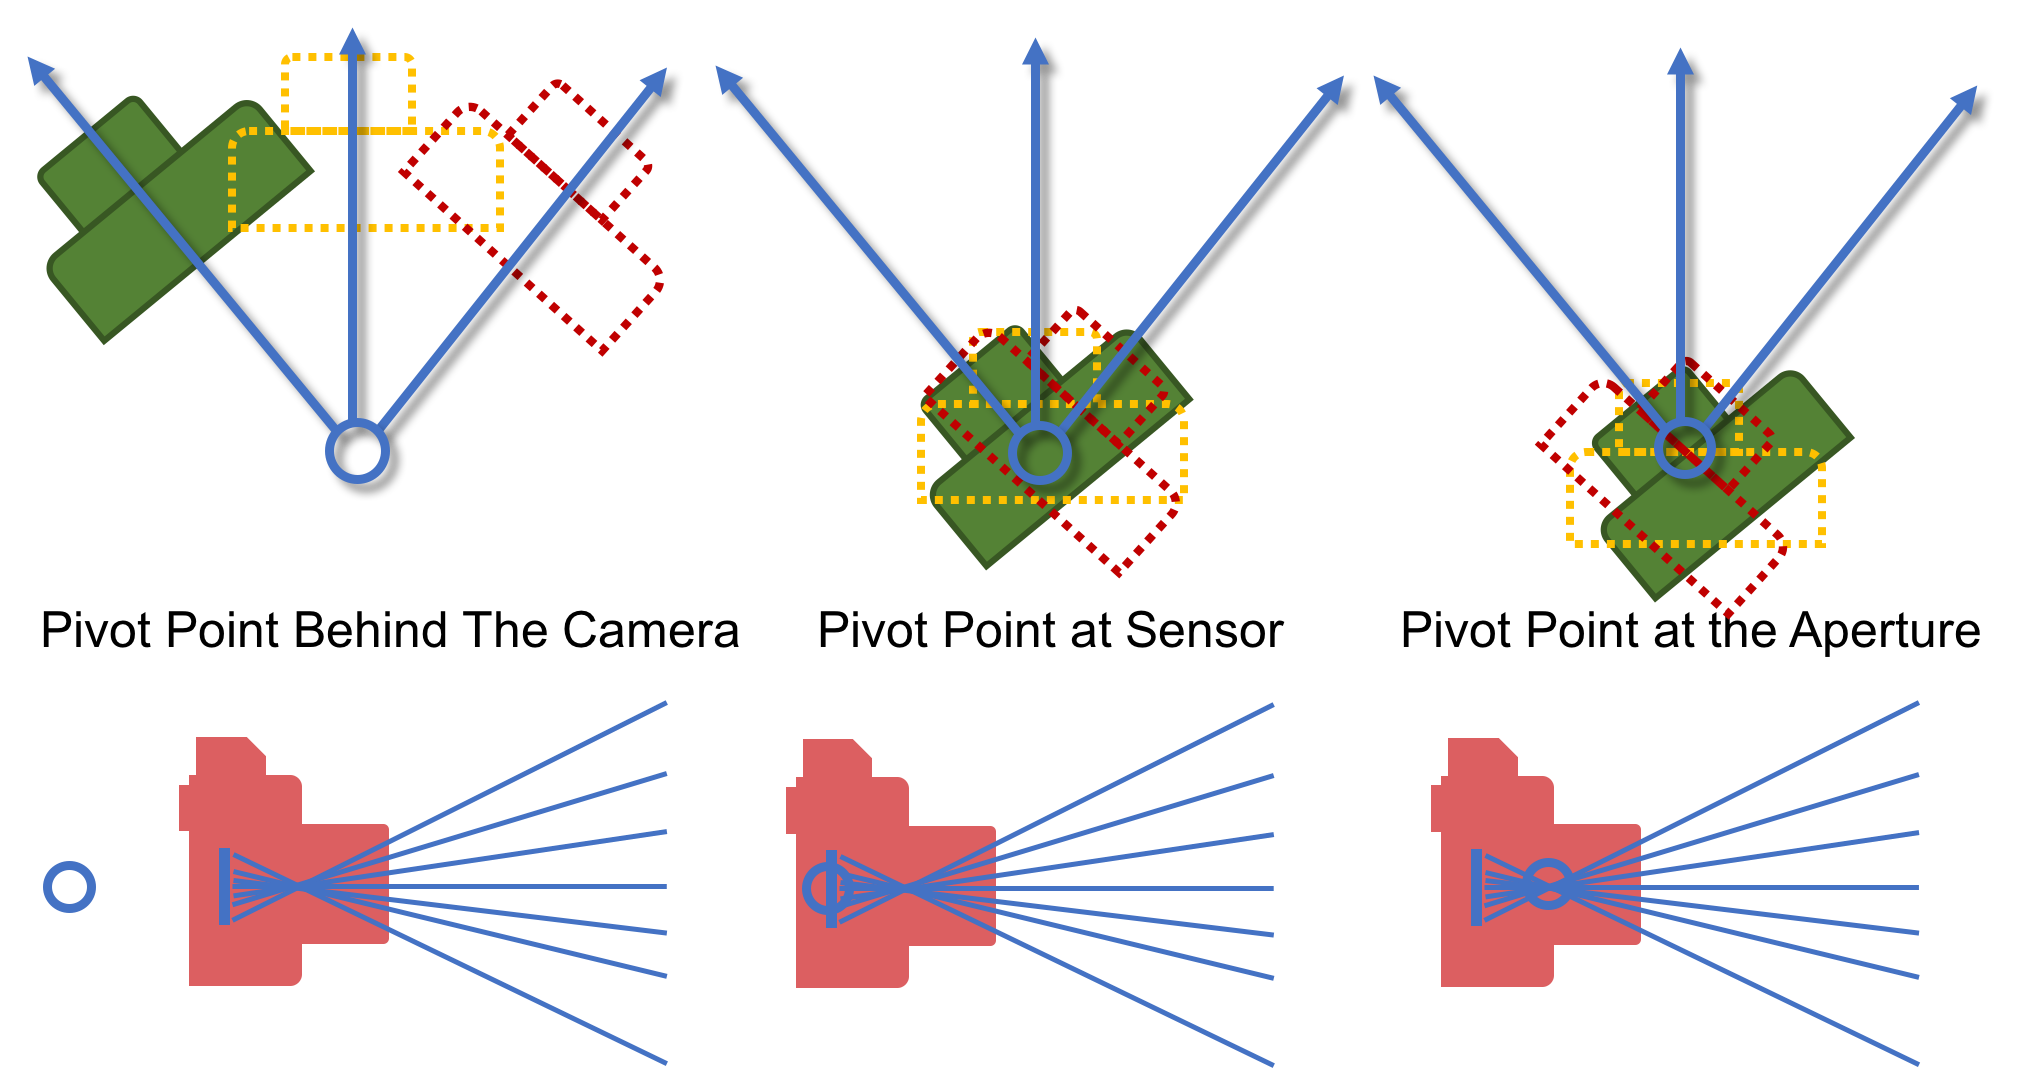
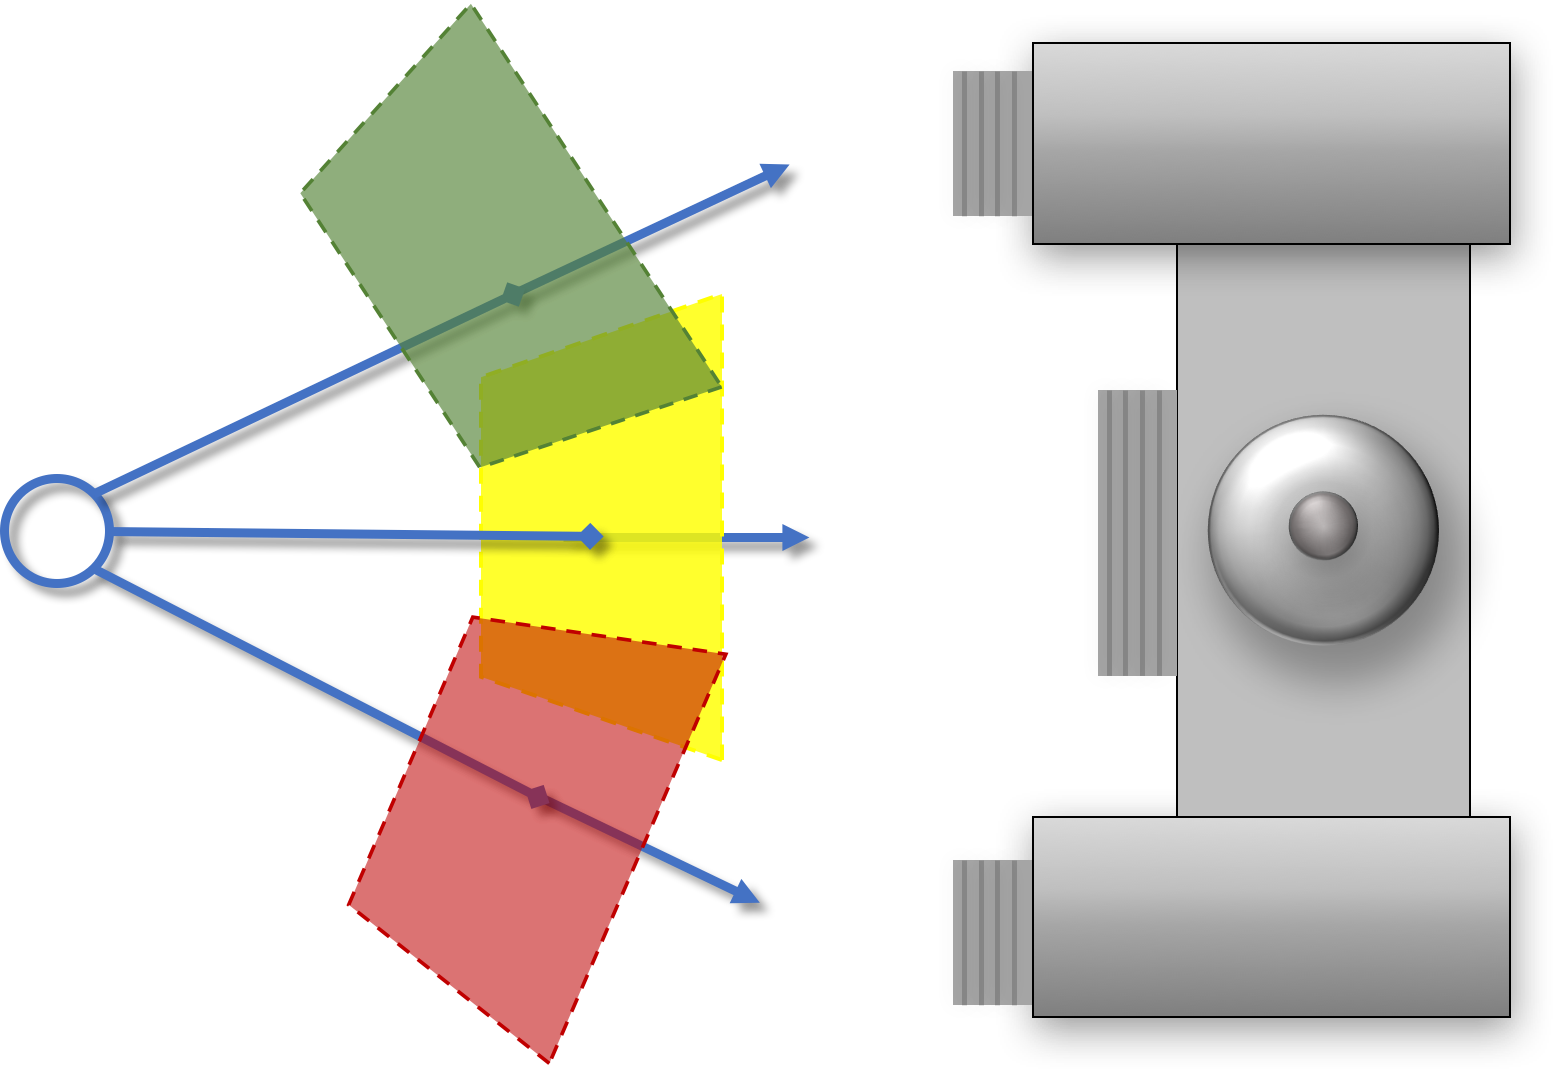
- Pivot Your Camera Properly – There are several ways you may be turning your camera to move from one piece of your panorama to another. This can affect the amount of distortion in your photos and cause the stitching program difficulty with matching up similar items. Pivoting at the lens aperture is considered ideal because of an issue called “parallax.” For a more in depth understanding of the problem you can read this article. I will say that I’ve taken pictures with each of the methods from the photo below and have gotten decent results from each.
- Pivot Point Behind Camera – If you shoot handheld, you will likely transition from one photo to another by turning your neck or body.
- Pivot Point At Sensor – If you shoot from a standard tripod mount, you likely pivot around a spot underneath the body of your camera, somewhere in the proximity of the sensor.
- Pivot At The Aperture – As I said earlier, this is considered the ideal. There are special brackets you can get for your tripod that allow you to offset your camera so that the lens lies over the pivot point of the tripod.
Take it to Photoshop
- Open the Photos in Photoshop
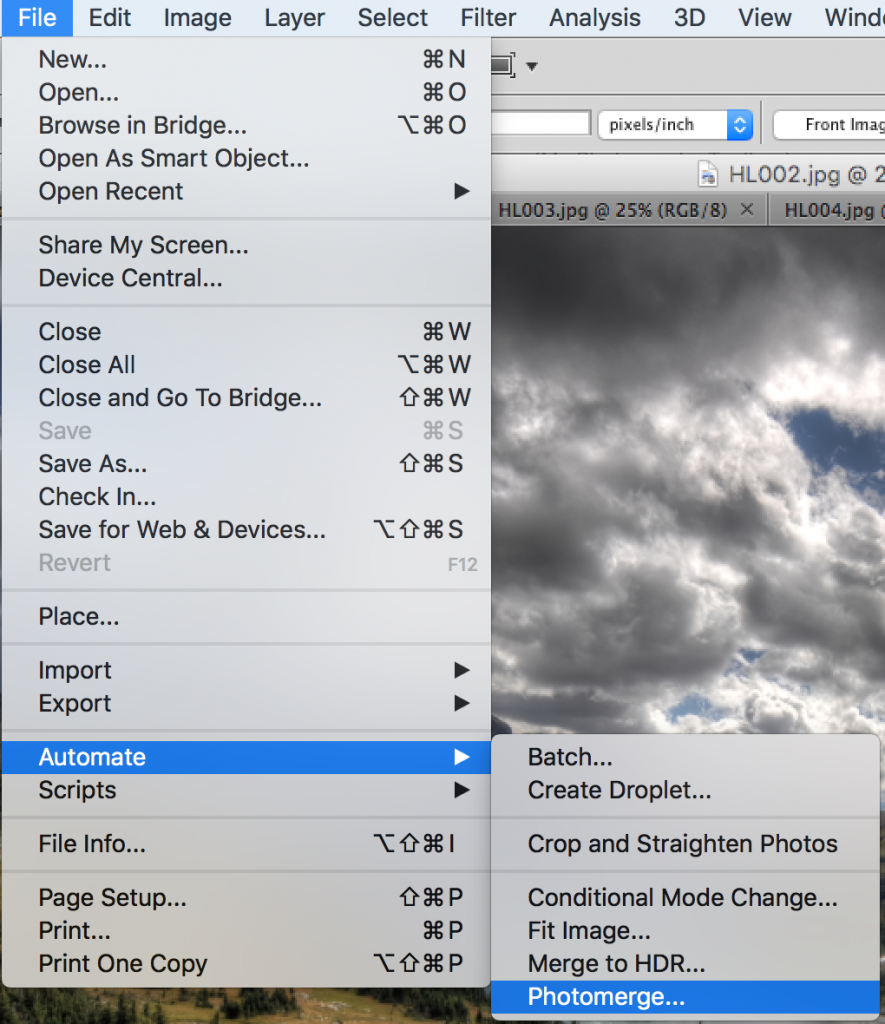
- Select File > Automate > Photomerge… – This will open a dialogue box.
-
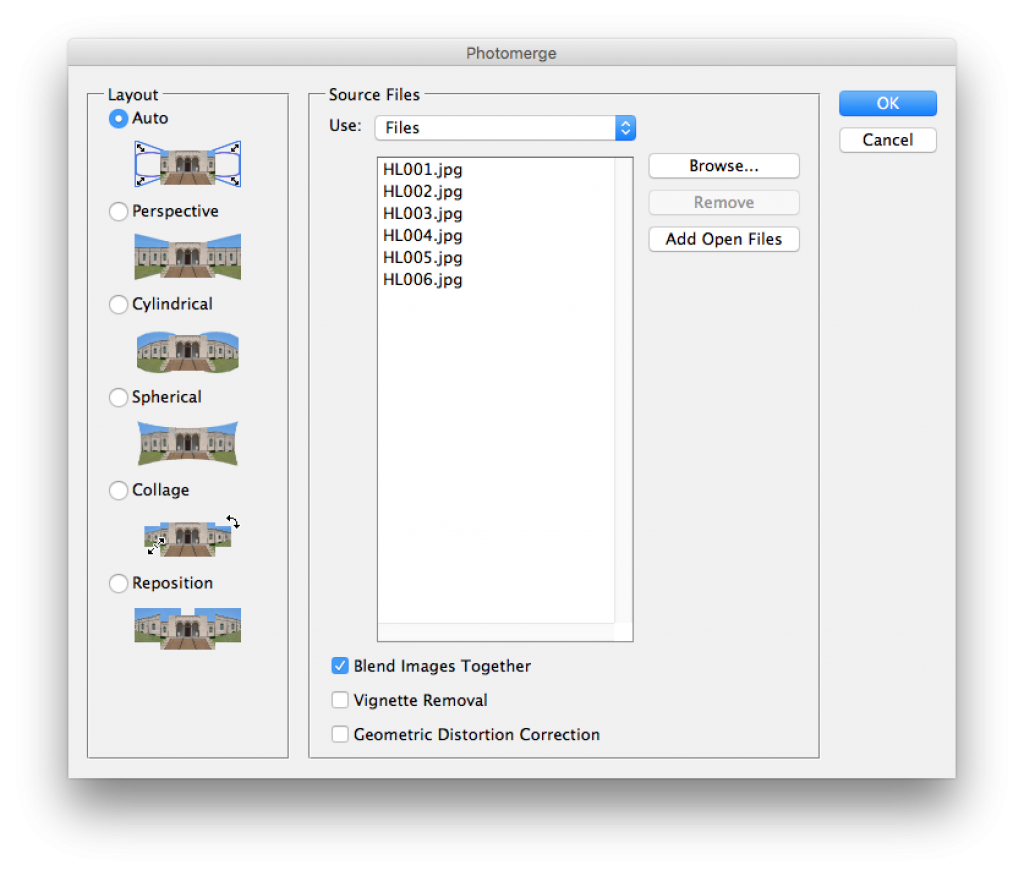
- Click ‘Add Open Files’ – Since your files are already open you can add them to your panorama using this button. If you opened this dialogue box before opening your photos, you can click ‘Browse…’ and select your photos.
- Select Layout – Select the option that makes the most sense depending on your subject and how much lens distortion your photos have. I usually choose ‘Auto.’
- Click ‘OK’
-
- Panorama Output
-
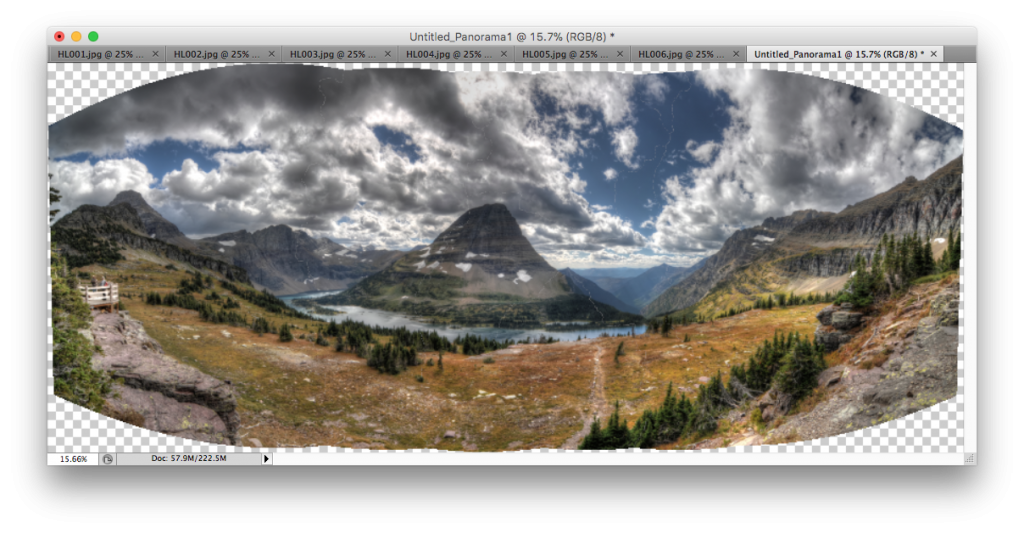
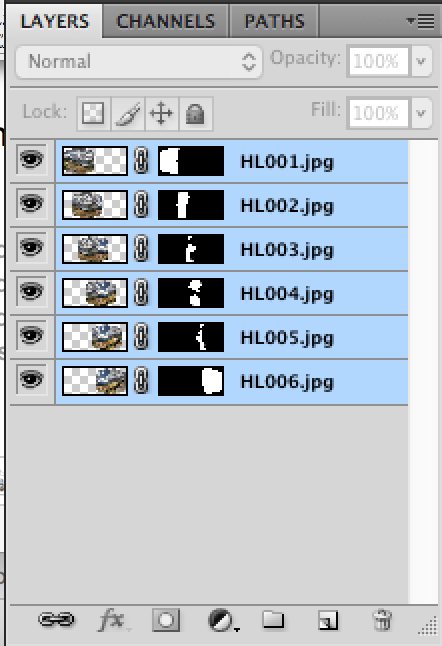
- Layers – If you look at the layers in the lower right of the screen, you’ll see the portion that was sampled from each photo. You can see that, in my set of images, there was so much overlap that the stitching process barely used any of photos 3 & 5. You can use this as feedback on your technique. Obviously, I need to pan more between images.
- Select Layer > Flatten Image – This compress the layers into a single photo.
-
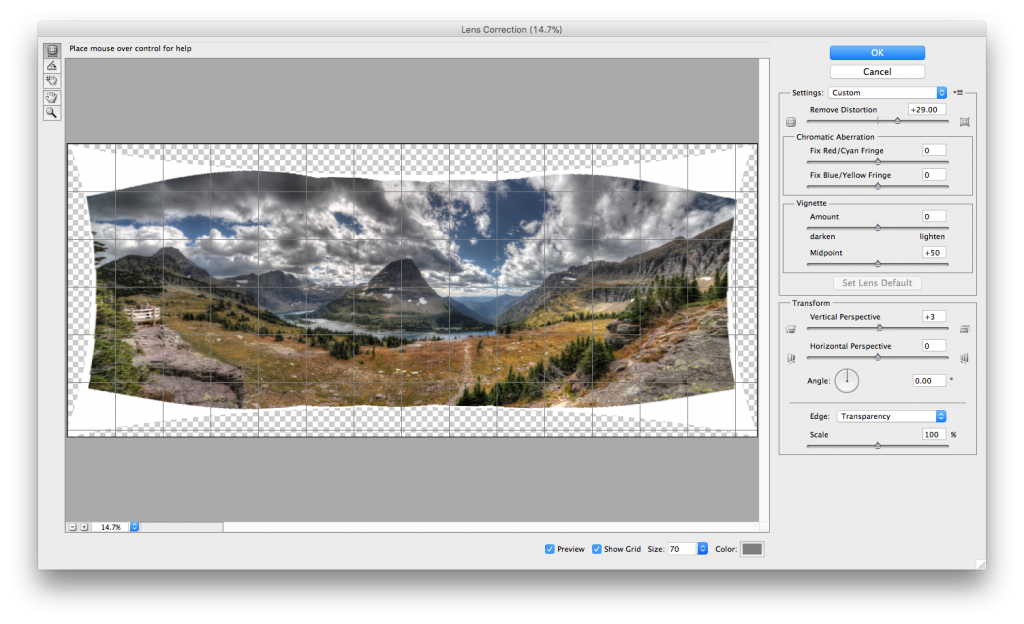
- OPTIONAL – Lens Correction Filter (Filter > Distort > Lens Correction) – The final panorama may show some distortion, especially if you use a wide focal length or were close to your subject. In the panorama output above (taken at 11 mm), the photo bulges outward on the top and bottom. You can fix issues like this using the Lens Correction Filter in Photoshop.
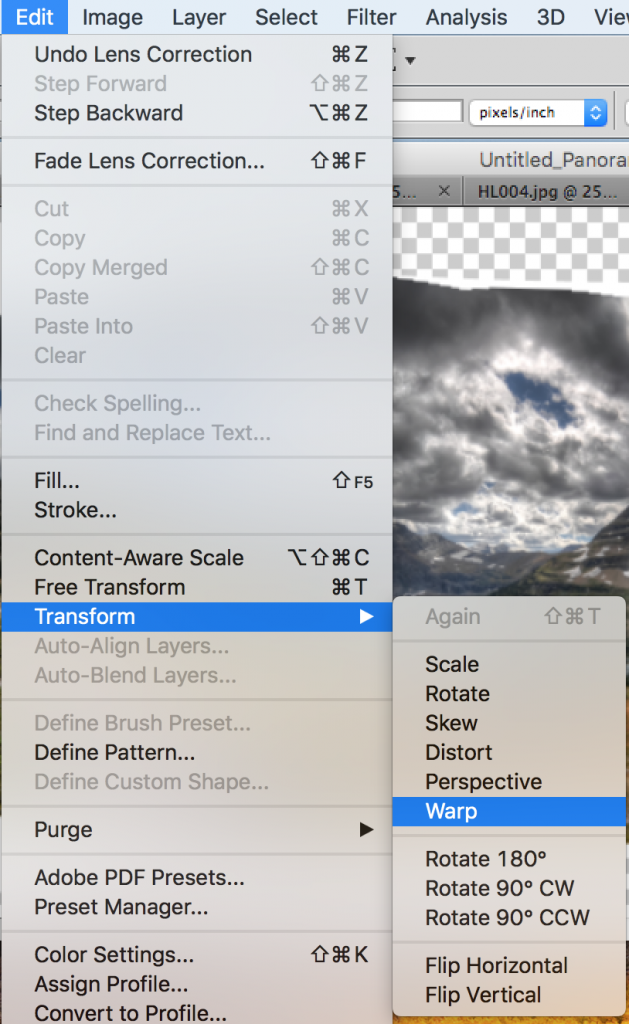
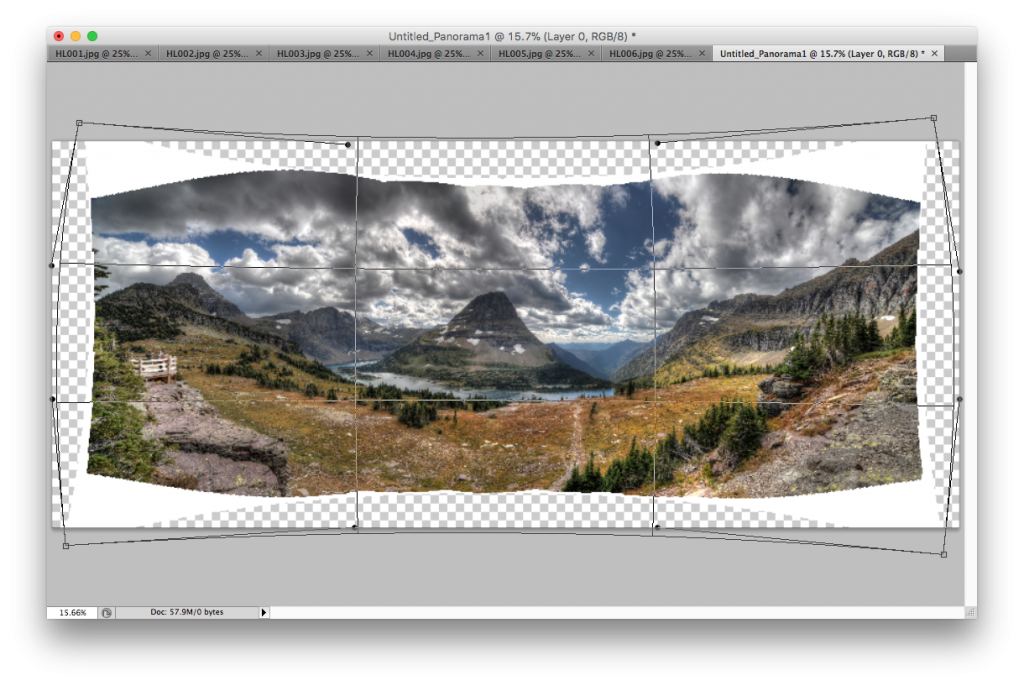
- OPTIONAL – Warp Your Photo – I recently watched a video in which Klaus Hermann shows his Vertorama workflow. One very small piece of that is how he deals with the output of the panorama stiching process in Photoshop. Rather than use the Lens Correction Filter, he uses the Warp command and make the necessary adjustments there. This can also be done in conjunction with the Lens Correction Filter.
- Crop – This is where you define the dimensions of your panorama and dictate what the final product will look like.
- Click on the Crop Icon

- Select the Dimensions of Your Crop Box – If you visit Bay Photo, Black River Imaging, or any other large format printer you will find the “standard” ratios for wide-format photos are 2 X 1 and 3 X 1. I show examples of these two crop ratios below.
- Select the Area You Wish to Crop
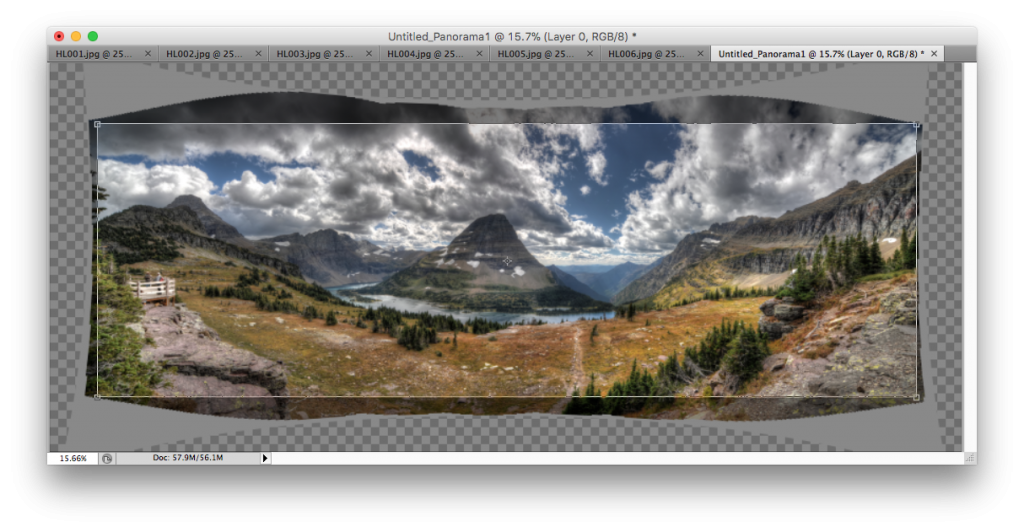
- Click on the Crop Icon
- Select Layer > Flatten Image
- Save Your File
The Final Product
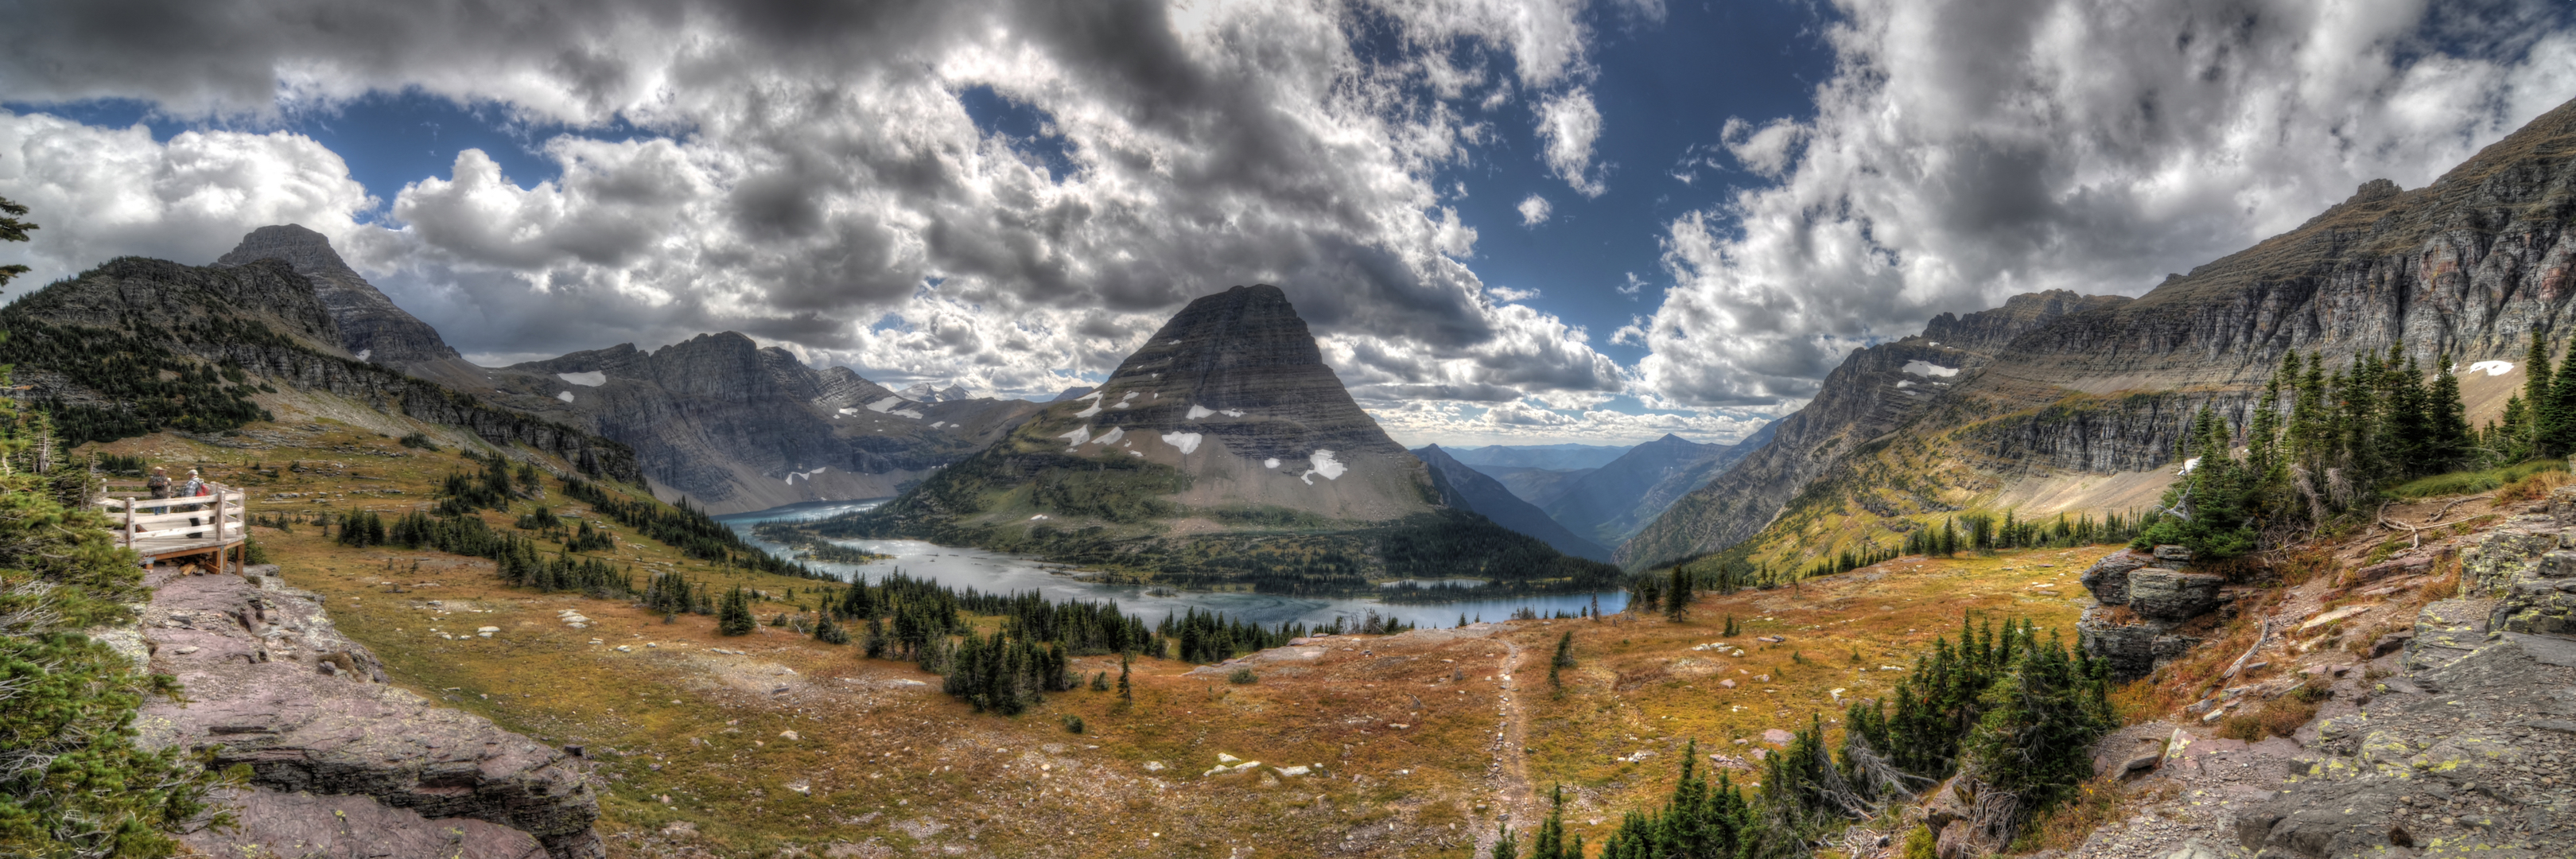
One Last Example

Some Additional Inspiration
- See my Panorma Gallery on Flickr.
- Check out the work of Tim Poulton, one of my favorite panorama photographers.
- Check out the work of Klaus Herrmann, one of my favorite vertorama photogaphers.
If you have any questions or comments about this article, let me know using my Contact page.
Pingback: Photographing the DC World War I Memorial | brandonkopp.com
Pingback: Photographing the Interior of the U.S. Capitol | brandonkopp.com