
I originally wrote this article in 2013. So much has changed since then. I updated the article, mostly deleting tools that I once used that are now discontinued. I guess other people didn’t appreciate them as much as I did. Admittedly, I hadn’t used them in a year or two either so I was part of the problem. I hope to update this post with some new ideas and tools soon.
I’ve spent nearly all of my adult life in college. I was broke. A few years ago, I started my first “real” job and started earning some money but was very apprehensive about using my vacation days. I now have the combination of means (money) and opportunity (vacation days) and I have started to think about traveling. Through this process, I realized that I don’t know how “normal” people plan vacations. Over the years that I’ve been planning, I’ve discovered a number of tools and techniques that I find helpful in making the most out of my time while traveling. My hope is that this article can offer advice (or at least some ideas) to people who are in the same, confused position.
Much of what I will write below comes from planning for a trip I took to Glacier National Park a couple years ago. I will use this trip to illustrate the value of the tools that I’m talking about. Some of these tools are applicable to landscape, outdoor, or hiking type photography, but some can be used for visiting cities, international travel, and so forth.
Where to Go & What’s Worth Seeing
There’s a scene in the movie Moneyball where Jonah Hill’s character is explaining his philosophy of baseball to Brad Pitt. He tells him that the goal of running a baseball team shouldn’t be to buy players; it should be to buy wins and to get wins you need to buy runs. I have a similar philosophy when it comes to vacations; it’s not about purchasing plane tickets or hotel rooms, it’s about buying memories and photographic opportunities. So when determining where to go, I want to know that there are enough places and times to photograph to make the trip worth the time and expense I’m putting into it.
First, I have to have a general idea of where I want to go. Inspiration for that can come from pretty much anywhere. I recently watched the documentary The National Parks: America’s Best Idea and was inspired to visit all of America’s 59 National Parks. In particular, I was fascinated by Glacier National Park.
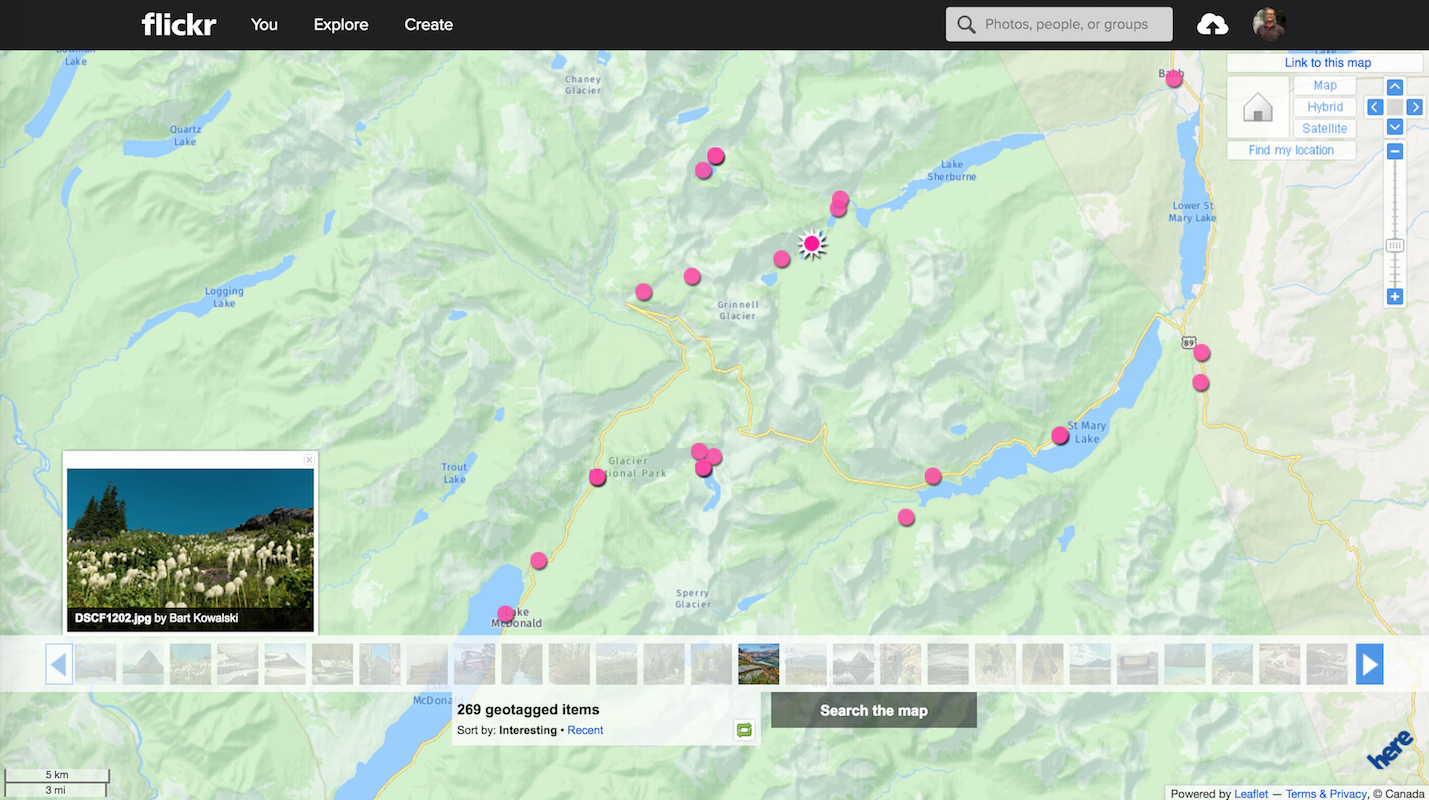
Next, I start “gathering ideas.” My first stop is usually Flickr, but you can use whatever photo site you’d like. I find Google Image search often gives too many irrelevant results. On Flickr, I’ll type in search terms like “Glacier National Park” (using the quotes is helpful) and sort by “interestingness.” I go through the screens of pictures and add them to collections or pin them to Pinterest. You will occasionally see the same photographers with great, high-ranked pictures; these people often have their own websites that are also worth visiting. For Glacier National Park, you’ll see names such as QT Luong, Tom Lussier, Varina Patel, and Trey Ratcliff.
Once I’ve gathered a number of ideas, I use the title, caption, or geolocation information to plot them on a Google Map. This is helpful for seeing how dispersed the locations are. You don’t want to spend your vacation driving from place to place. For pictures in remote areas, I draw in the trails using trail maps or other sources of information. This is helpful because Google Maps will let you know the distance so you can better plan how long the hike will take. I also try to find videos and embed them into my maps. Videos can tell a story that you just can’t get with a photo.
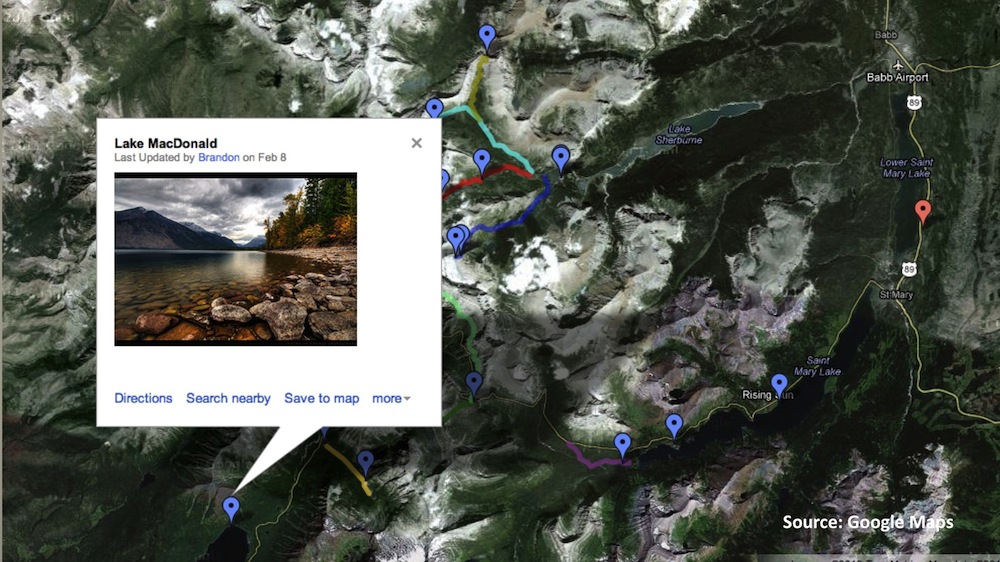
Once I’ve plotted everything on the map, I start searching for hotels and nearby towns with airports. The maps are helpful in this process because I can calculate distance and drive times. At Glacier, most of the non-resort hotels were 45-60 minutes from the photos I wanted to take. That makes for a lot of driving early in the morning and late at night. So I opted for one of the hotels inside the park. Once I’ve found travel and lodging accommodations, I plot those on the map as well. Click on the pins or trails on the map below to see photos and videos.
[googlemaps https://maps.google.com/maps/ms?msa=0&msid=215447723233123953430.00049662729c943c991b7&ie=UTF8&t=h&ll=48.758452,-113.67897&spn=0.22633,0.583649&z=11&output=embed&w=100%&h=600]
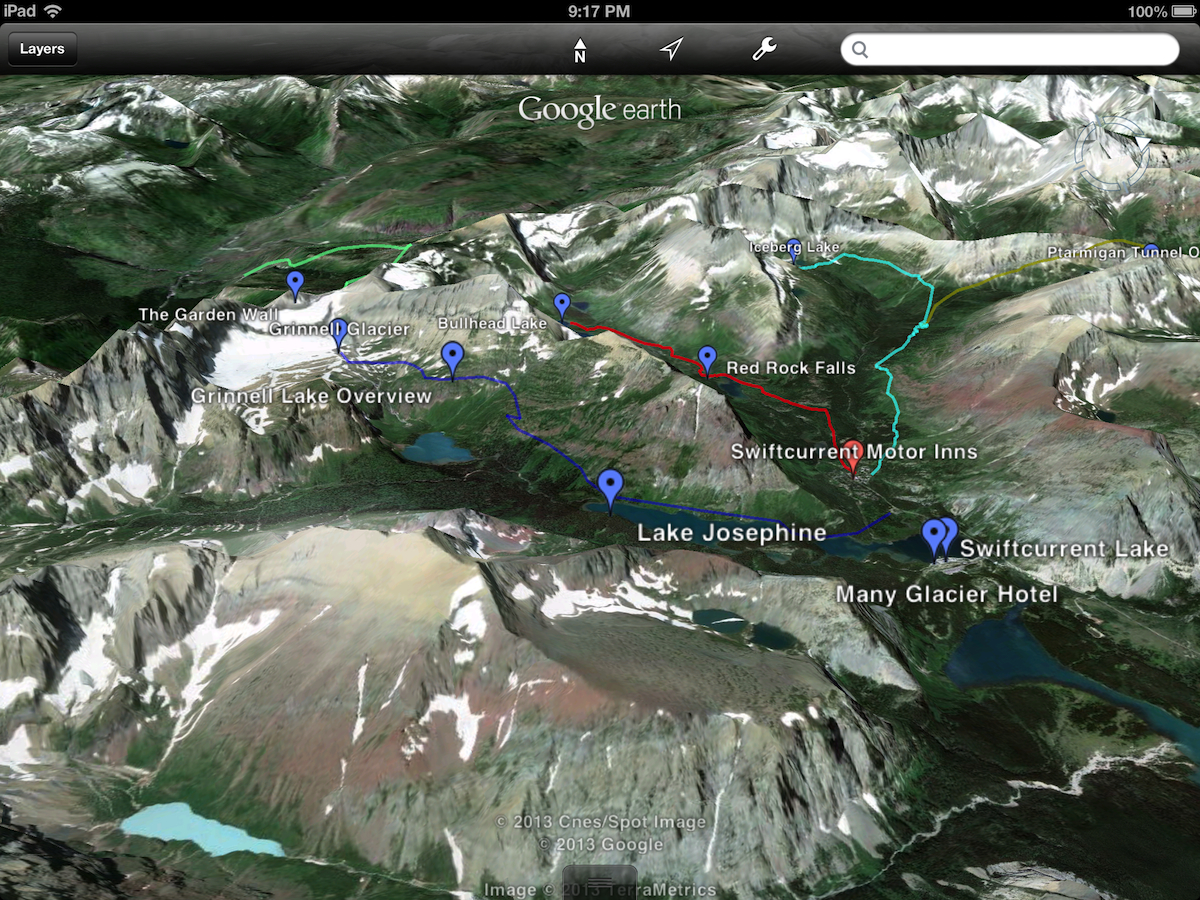
Once the map is built, it is quite versatile. I can embed it on a website, I can send friends and other travelers links to it, or I can export the information to a .kml file and people can upload it to their accounts or into Google Earth. Having the information ported over to Google Earth is helpful because you can see your photo locations and trails plotted in 3-D and get a better sense of what the conditions will be like. This is especially dramatic in a highly three-dimensional place like Glacier National Park. You can also allow others write-access to the map so it can be built collaboratively with your fellow travelers. This transition to Google Earth is also helpful for built-up areas like Washington, DC, where 3-D renderings of buildings can be displayed.
Useful Tools
There are tools available that can save you the trouble of constructing your own maps. They aren’t quite as versatile as Google Maps; you can’t draw trails, calculate distances, add videos, or export to any other format, but they can save you hours of photo searching and tedious HTML coding.
Flickr Map – I’ve already mentioned Flickr, but I’d be remiss if I didn’t mention the mapping feature. You can zoom into an area and look at photos. Any photos that are publicly available and geotagged will appear on the map. The tighter you zoom in the more specific photos you’re going to get. There are a lot of photos on Flickr though; some great, some good, and a lot of bad. For popular locations you are going to have to sort through a lot to find some inspiration.
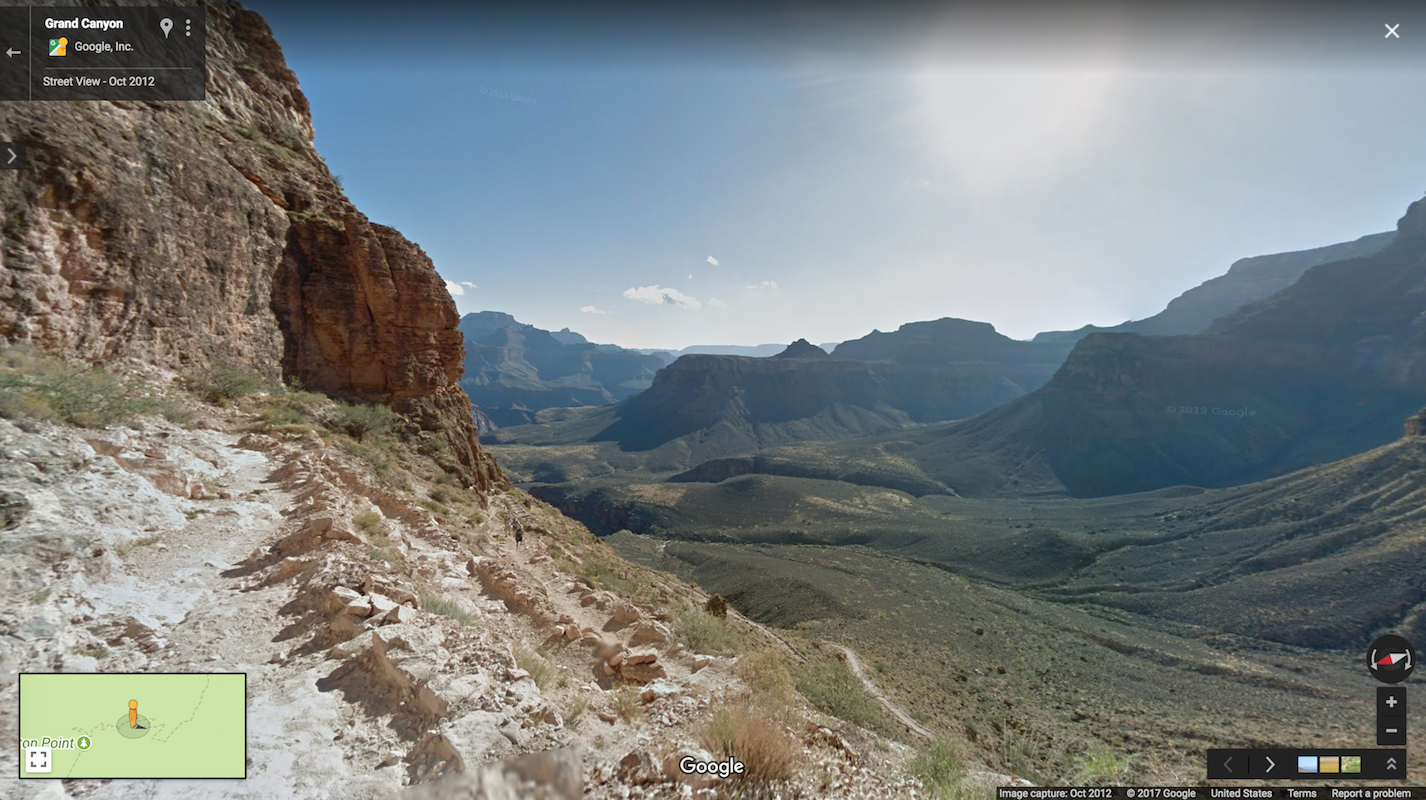
Google Maps – Google Maps has a service called Panoramio where people can drop their pictures, 360 panoramas, and other media onto a map and they become publicly available. Like Flickr Maps, I have found it frustrating to find inspiring pictures, but sometimes that’s not what you’re looking for, you might just want ideas. For that purpose, Google Maps is sufficient. Google has also started offering streetview for trails. They have been expanding this feature for years now and are enlisting average folks to hike trails with their special backpack. This has awesome potential for finding sites to photograph from. I wasn’t more than 2-seconds into this virtual hike when I saw this view.
When To Go
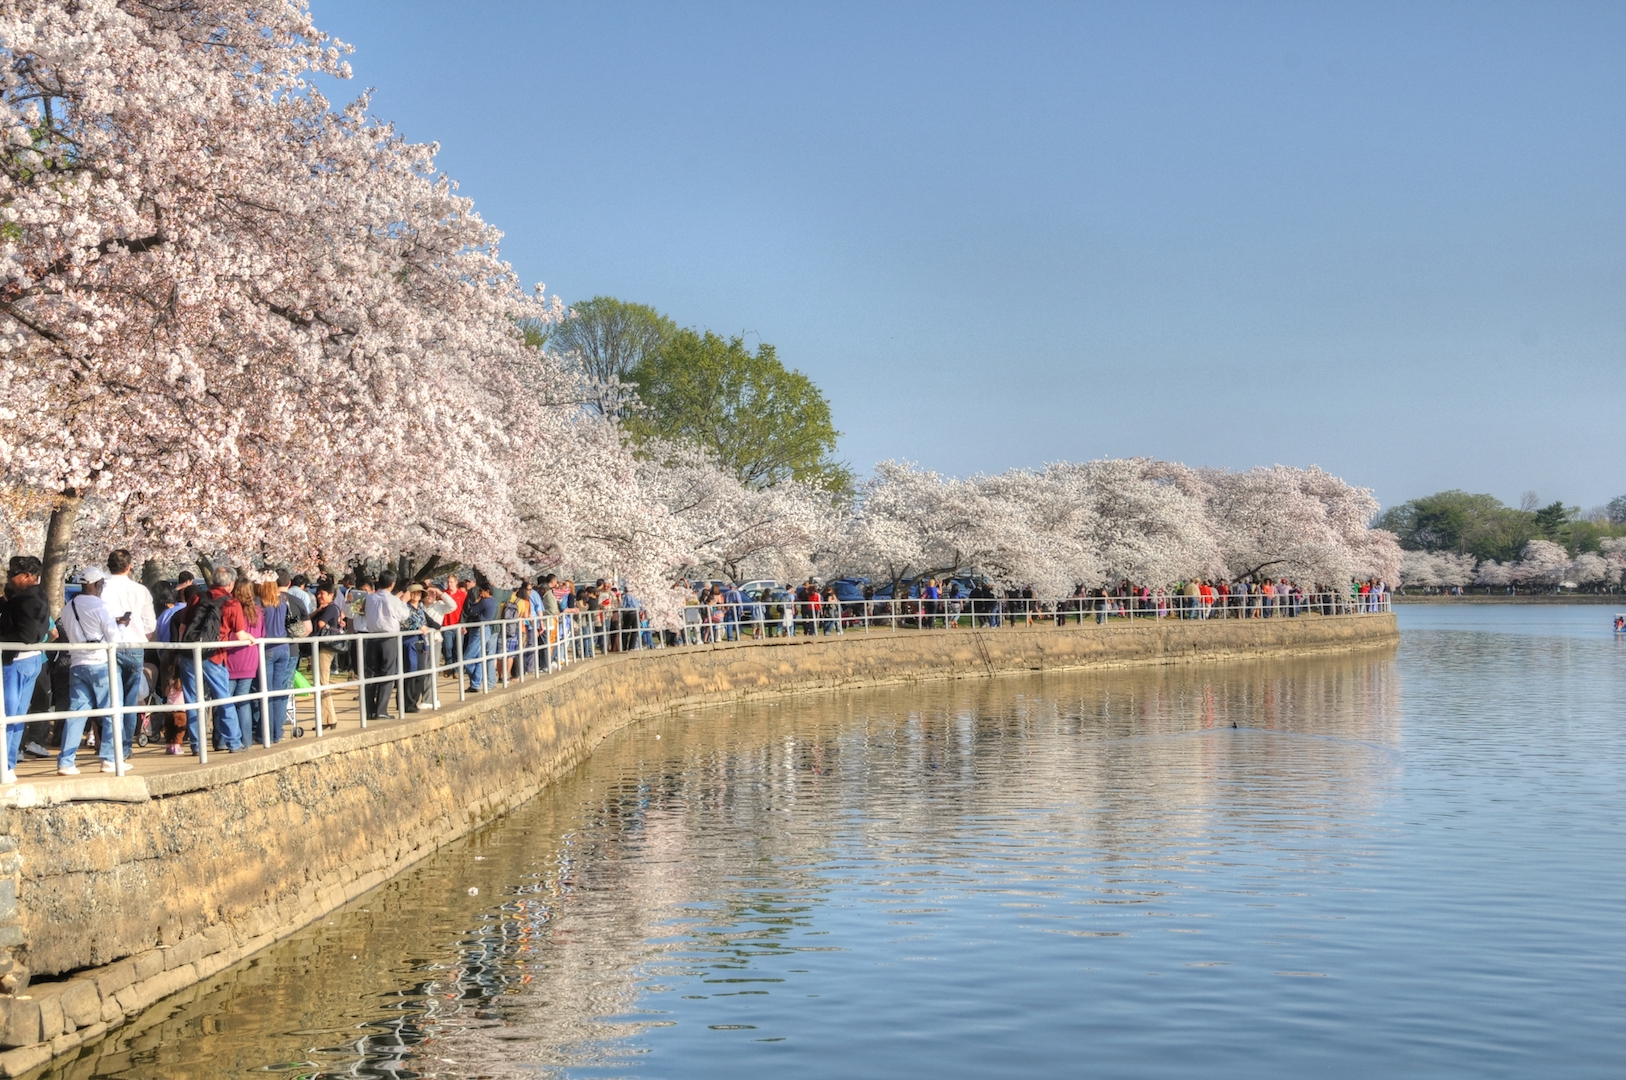
Regular readers of my DC-area photography blog posts know that I am not a person photographer. With several exceptions (e.g., giving an object a sense of scale), I’d rather my landscapes, cityscapes, and seascapes be person-free. So I’m always interested in finding times of the day and times of the year when traffic is low. Time of day is easy; earlier is almost always better. Time of year is dependent on a place and what draws people there. People generally go at certain times because the weather is ideal or because there’s a specific, time-constrained attraction (e.g., the cherry blossoms in DC). I try to balance these tradeoffs when deciding when to go.
Visitors
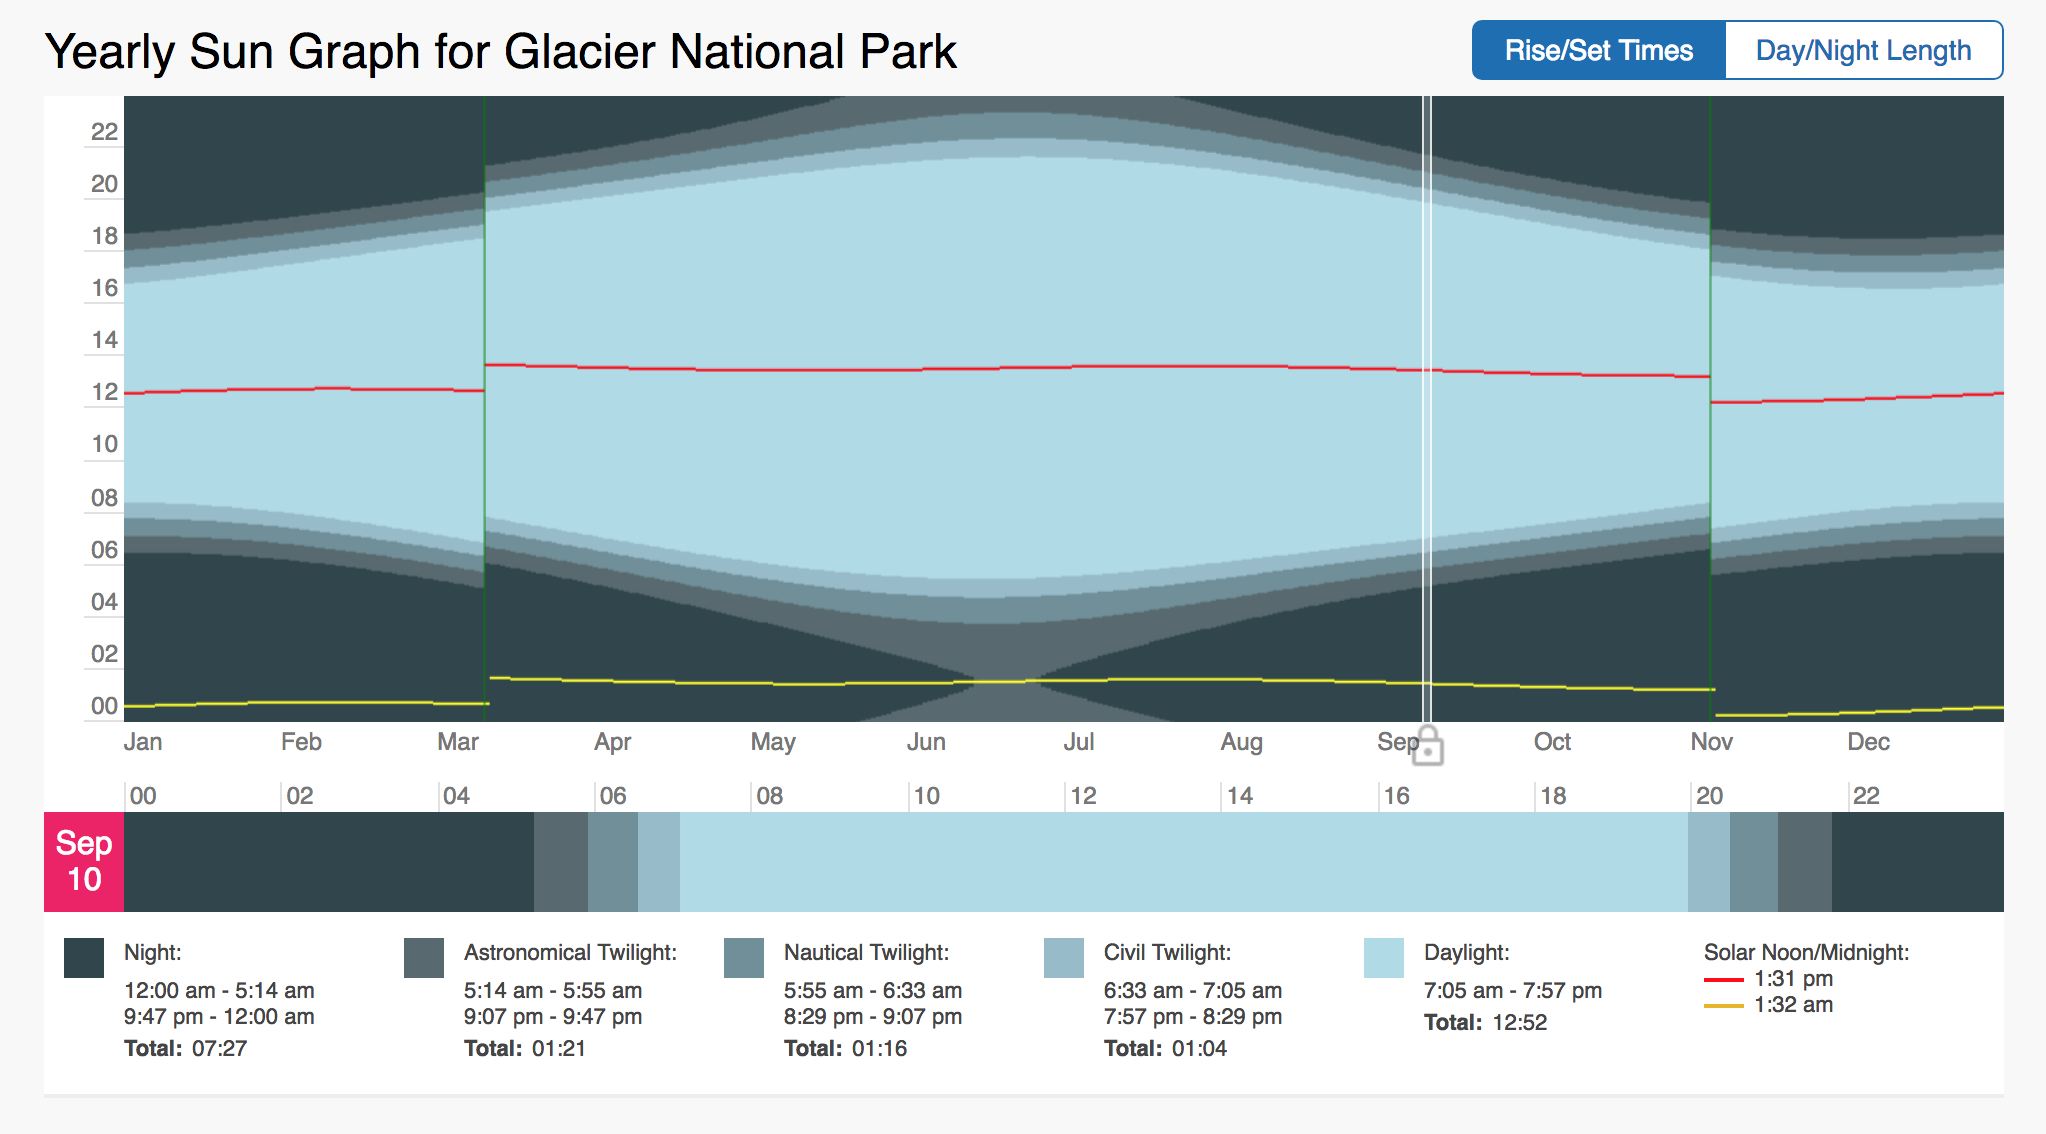
The Internet makes it easy to find information about the best time to go. For National Park Service parks, in particular, there is a site that provides statistics about monthly visitor levels. I have used this a lot to plan my trips to various National Parks. The graph below shows average number of visits per month to Glacier National Park. From the graph you can see that there is a spike in traffic between June and August. I originally planned on going in May because you can see the relatively small number of visitors, but found out in the planning process that many of the hiking trails and roads don’t open until late June because of lingering snow. So that, and the fact that most businesses are only open during the summer, explains the uptick in traffic. Rather than travel during the peak months of June-August, I decided to plan my trip for September, at the very end of the tourism season, when trails are still open and many would-be travelers have packed it in for the season.
These data average monthly visitor levels from 1979 – 2013 to give you an idea of how busy the park might be. You can select different parks. NOTE: Though the X-axis shows January – December 2000, these are actually averages and not just data from the year 2000.
Weather
I also find myself consulting climate statistics for places I want to visit. Ideally, I would find a time when the temperature is pleasant (between 40 and 75 degrees). You can find average temperature and precipitation information on Weather.com, Weatherbug, etc. You can also find this information on location-specific websites. Almost every National Park specific webpage on NPS.gov has climate information. Since I knew I would be referring back to National Park information quite a bit, I created the dataset below using archived weather data from the National Oceanic and Atmospheric Administration’s Climate Statistics Website.
This graph shows average temperature and precipitation by month. Hover over the line to see values for each month. You can select different variables and parks in the panel on the left. NOTE: Even though the X-axis reads “2000,” these are monthly averages of NOAA weather data dating as far back as the early 1900’s. The “2000” should be ignored.
Useful Tools
Once I’ve decided on a set of days I want to go, I can start to see what exactly getting to a place “early” means by using The Photographer’s Ephemeris (TPE) and Google Earth Desktop.
The Photographer’s Ephemeris – TPE allows you to drop a pin on a Google map and see not only the sunrise/sunset and moonrise/moonset times but also the direction the sun and moon will rise and set. This gives you some idea of what the lighting situation will be, especially when you have objects such as mountains that are likely to create long shadows and greater dynamic range you’ll have to think about when photographing. TPE also, importantly, gives you the beginning and ending of twilight times; when the first hint of light will first appear on the Eastern horizon or when the last hint of light will disappear from the Western horizon. This is important if you’re interested in capturing stars. I spend so much time in the city, away from stars, that astrophotography is one of my primary goals when I travel. Having these times allows me to backwards plan and figure out when I have to leave to arrive at a destination before sunrise or sunset.


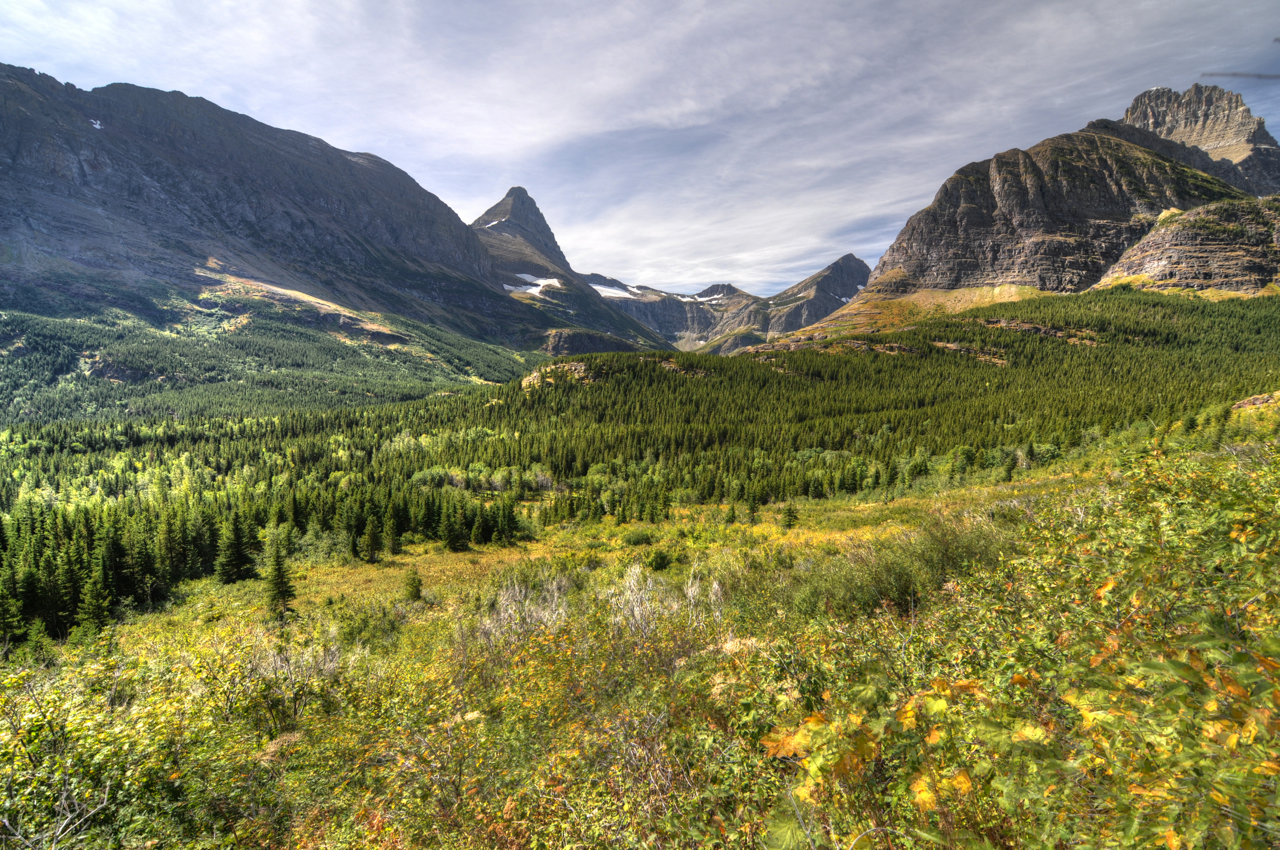
Google Earth – Google Earth is also extremely helpful because it saves you from having to use your spacial reasoning skills to guess at what the light will look like on a landscape. You can choose a spot on the map and use the Sunlight tool to dial in a particular time of the day and year. The program will show you, in a very basic way, what areas will be cast in shadow and what areas will be receiving light at a given time. The photos below show September 12th at 12:44 p.m. at a point along the Iceberg Lake Trail.

TimeAndDate.com – This is a fantastic site that provides a lot of the same information that The Photographer’s Ephemeris does (e.g., sunrise, sunset, moonrise, moonset, and twilight times as well as the azimuths for the rise and set of these bodies). I like using this site because it provides this information in a table format so it’s easy to drop into Excel, format the way I like it, and print it out to take with me. The drawback of the site is that it only provides this information for certain locations, not for any position on a map, but close is usually good enough for this information.
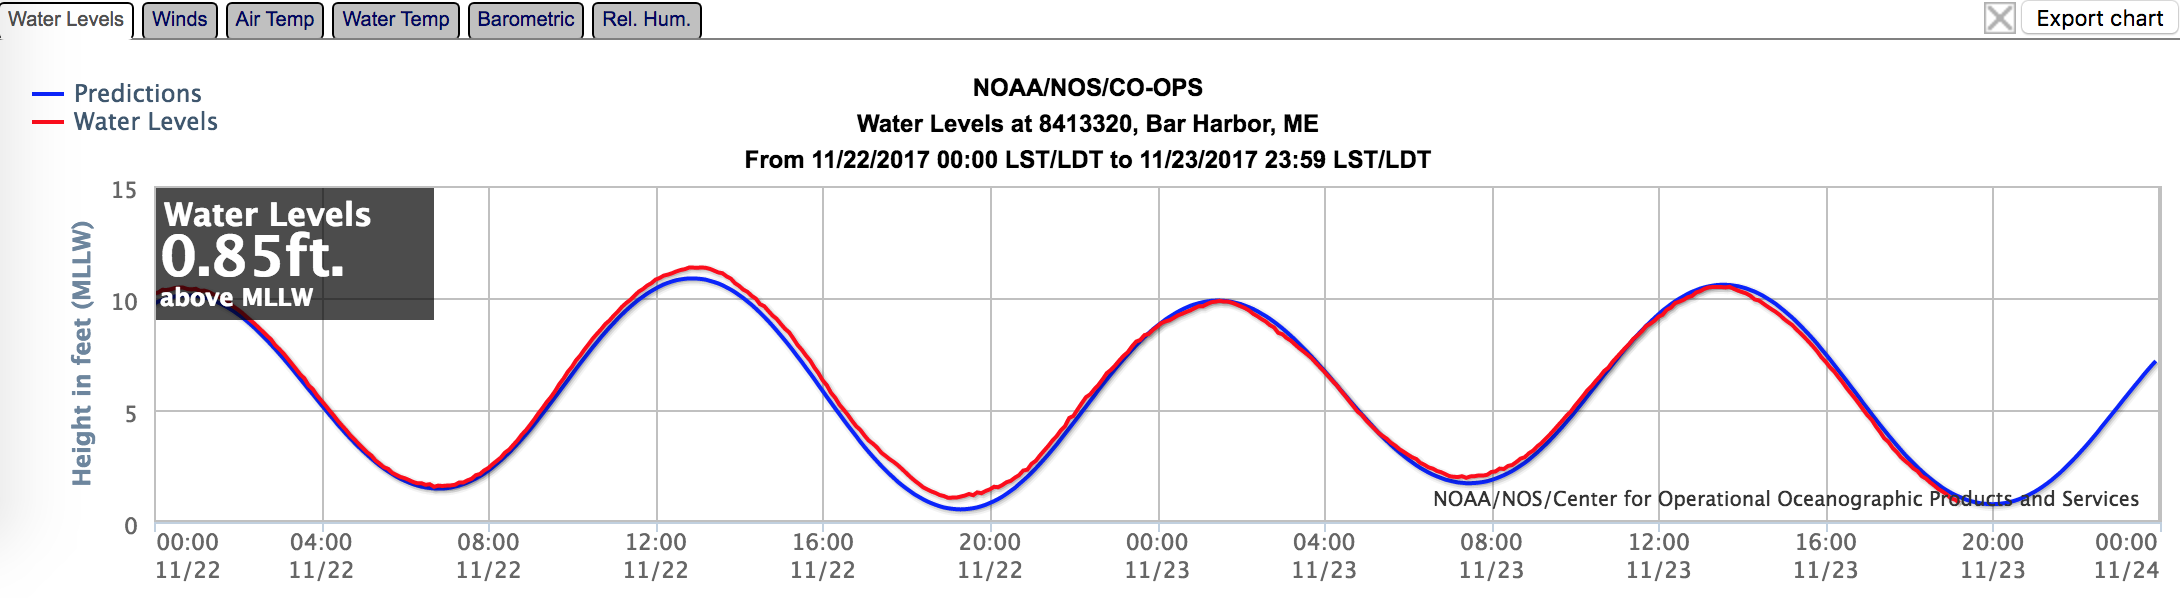
Tide Information at NOAA.gov – I recently took a trip to Acadia National Park, which is on the southern coast of Maine. I haven’t spent much time along the ocean and, until I took this trip, I didn’t realize how vital it is to know when the tides will be in or out. It can make quite a difference in whether you have a place to stand or not when visiting locations like the Bass Harbor Head Lighthouse. Tide charts provided by NOAA will give you a rough idea of when the tide will be up, and when it will be down.
What To Bring
Now that I know when and where I’m going, where I’m going to stay, and how I’m going to get there, I have to figure out what photographic gear to pack. I have a certain baseline level of equipment that I would bring anywhere (i.e., camera (obviously), an 18-200mm lens, and a camera strap). Anything beyond that is going to add weight, hassle, and possibly expense, so knowing if it’s necessary is important. For this, I once again go to Flickr. I look back through those photos I pinned, collected, or otherwise saved and look through the EXIF (click link for an example) information:
- If there are photos I like that require a focal length wider than 18mm (building interiors or vast landscapes), I pack my 11-16mm lens.
- If there are wildlife photos that require a focal length greater than 200mm, I pack my 70-300mm lens.
- If there are photos with shutter speeds less than 1/30 s, I pack my tripod and cable release.
- If there are waterfalls, I pack my neutral density filter.
- I then pack a bag large enough to carry all of this.
Useful Tools
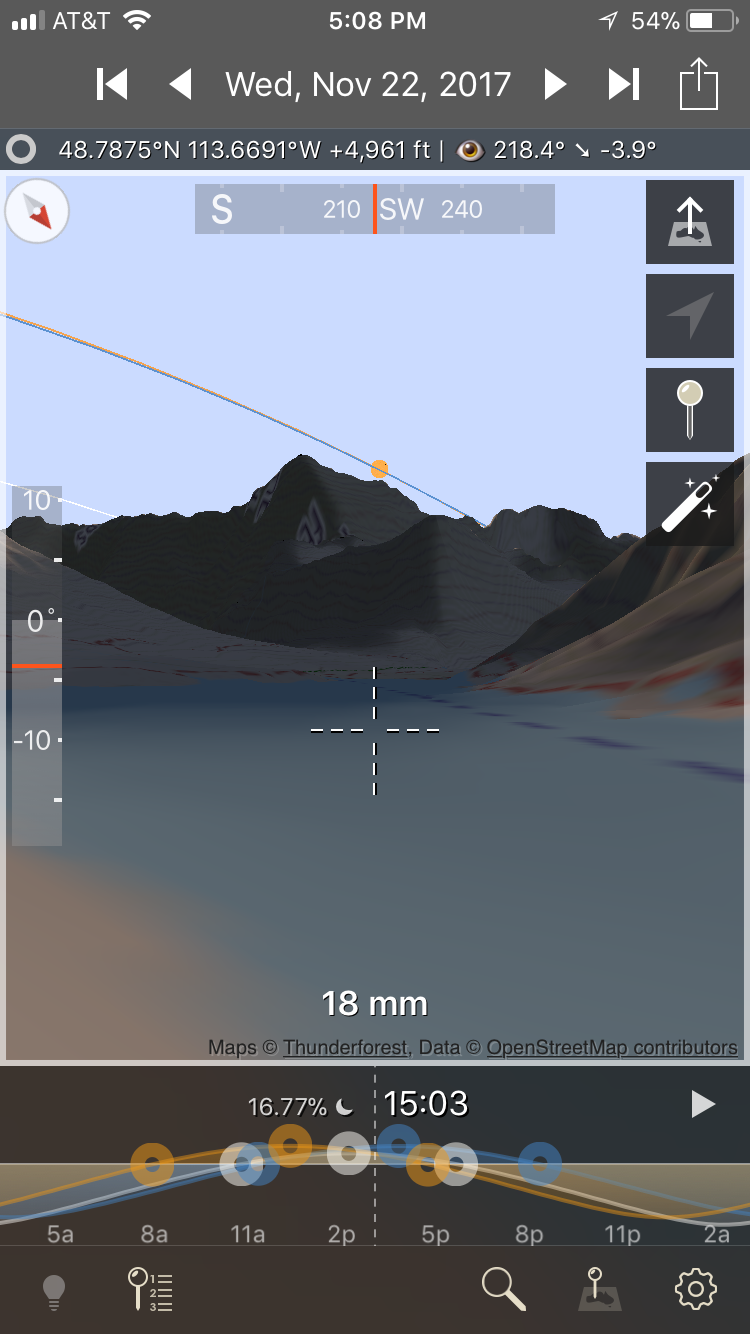
The Photographer’s Transit – Crookneck Consulting, the people who brought you The Photographer’s Ephemeris, have also released a new, powerful app that allows you to lay out shots and see what will be visible in your viewfinder based on the equipment you have and the focal length you choose. You simply drop a pin where you’ll be standing and another pin at the center of the scene you plan to shoot and then select the equipment you’ll be using. The app will show you the left and right limits of the scene you’ll be shooting and will even show you a elevation cross-section between you and you’re point of interest, along with what surfaces will be visible from your vantage point (left picture below). I’ve also used this feature to get some basic elevation change information about hikes I plan on taking.
The screenshot below shows the same shot from the Ephemeris above (looking west from the Iceberg Lake Trail in Glacier National Park) using an 11-16mm Tokina lens on a Nikon D300. This can be helpful in determining what type of lens you’ll need to bring to frame the shot you want.
Start Planning A Trip
- My Glacier National Park Gallery on Flickr – If you want to see what came of all of this planning check out my Glacier Park Gallery on Flickr.
- My Other National Park Galleries on Flickr – While you’re at it, check out my other galleries. I’m planning on building this gallery as I visit new parks, so check back.
- My Pinterest Boards – My collections of other people’s photography of National Parks and other places I plan on traveling to.
- Planning a National Park Road Trip on OutdoorPhotographer.com – I decided to post the article above after I read this article in one of my favorite photography magazines. It’s not very good, but it did serve as inspiration for this article so I wanted to make sure to provide a link.
If you have any questions or comments about this article, let me know using my Contact page.
Pingback: Mammoth Cave National Park | brandonkopp.com
Pingback: Mammoth Cave National Park | brandonkopp.com