The Library of Congress Reading Room has been described as the most beautiful room in Washington, DC (The Lost Symbol by Dan Brown), but unless you have a researcher card you’re not allowed inside. It’s not difficult to get a researcher card but they discourage people from getting them just to check out the room because they are nice, plastic-printed, photo IDs. With that said, most people don’t get a chance to see this beautiful room except for a small overlook. Worst of all, photography isn’t even allowed from the overlook so you have no chance to capture the room’s amazing architecture. However, twice a year, on Presidents’ Day (in February) and Columbus Day (in October), the Library of Congress opens up the Reading Room to visitors and photographers. If your trip to DC coincides with either of those days this is a can’t-miss opportunity.
When to Go
Obviously, you can’t pick your day, those are locked in. You can, however, pick the time you go and I am a fierce advocate for being early. I recommend going around 9:30, even though the Open House starts at 10:00. The crowds are as light as they are going to be at the beginning of an event so early is always better (unless everyone follows this advice). I’ve been to several Open House events now, and have arrived at the Library when it first opened at 8:30. There were only a few people there that early which offered a great opportunity to wander the Great Hall and take some pictures while I waited. The doors to the Reading Room are on the main level and, on Open House days, are clearly marked with a sign. I started the line around 9:30 and by the time the doors opened at 10 there were 30-40 people behind me.
Photographic Possibilities
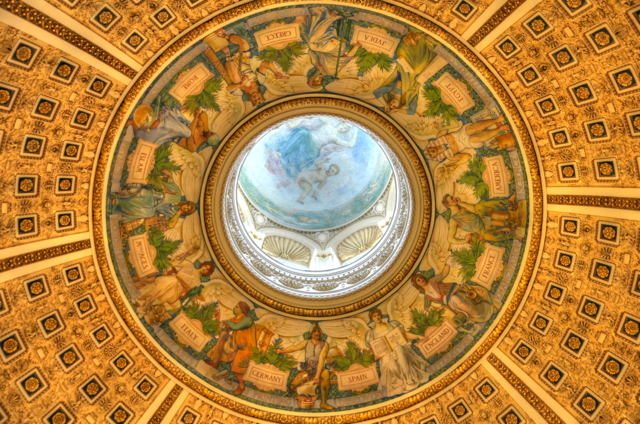 Look Up: When you enter the Reading Room, look up. That is the centerpiece of the room; a dome that is on par with the Capitol Rotunda in terms of its breathtaking murals and intricate design. You may find it difficult to photograph however…I did. It’s not quite as high as the Capitol dome so getting it all into a picture takes some work (or a wide-angle lens). Taking pictures at that angle is no easy feat either. Contorting yourself to look up while staying stable enough to take a shot of up to 1/6 of a second can be difficult. Also don’t forget to capture the statues that ring the room and the ornate, albeit creepy, clock that sits above the door you entered the room through.
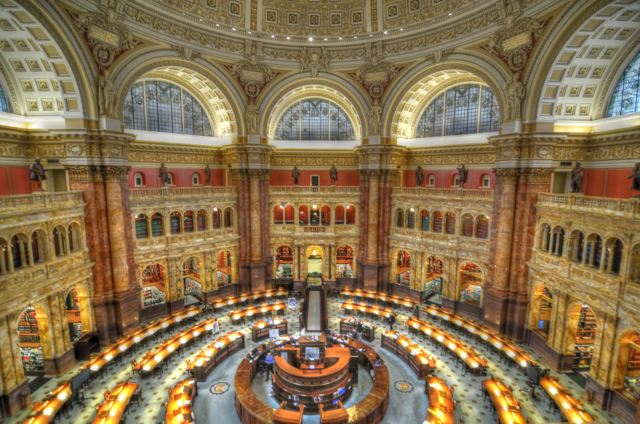 Look Down: Though photography is not normally allowed from the Reading Room overlook, on Open House days it is. Climb the stairs to get an amazing view of the circular layout of the room. It’s less than ideal to have the people wandering through the shot but there’s no way around that. There is thick security glass all round the overlook, and while the room is dim there are reflections on the glass you’ll have to contend with. I would suggest bringing a circular polarizer, but the room is already so dim that you’ll have to take a relatively long exposure (up to 1/2 a second) so cutting down the light that much more is not very helpful. However you slice it you will need to steady your camera. Try not to put your skin against the glass when you steady yourself. I got up there after it had already been visited and there were finger and face prints on the glass. Be respectful and try not to leave smudges behind.
 Book Alcoves: Around the outside edge of the Reading Room are a series of two-story high book alcoves. The book podium, railings, and ladders all have a classical look and each of these alcoves is colorfully painted. From what I’d seen on Flickr, these were the feature I was most excited to photograph. I was worried that they would fill up with people. Luckily, the alcoves are off-limits. The staff sets up rows of chairs that block traffic from reaching them so if you can get up to the chairs you will have an unobstructed view. You’ll want to use a wide-angle lens to capture these.
 Chairs: The chairs that sit at each of the Reading Room desks have exquisite detail. Pull one out and check out the eagle logo carved into the backrest.
 Desks: The Reading Room is circular and there are desks that form concentric circles around a central book issuing station. These desks have lamps and antique wooden chairs. Getting a shot of a row of desks can be difficult as more people start to fill the room.
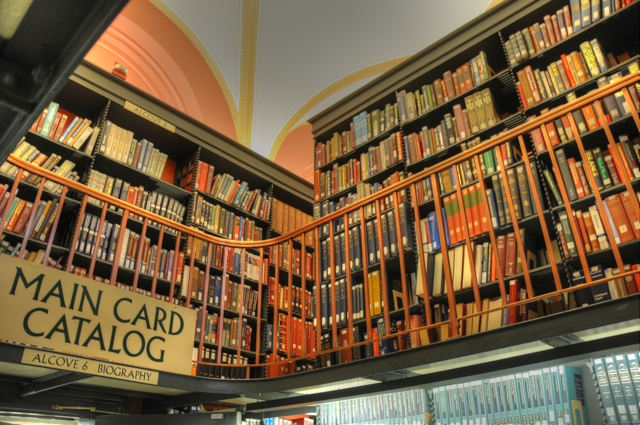
 Card Catalog Room: The card catalog room looks like the unfinished basement of a house I used to live in with rows upon rows of old-school card catalog shelves. For the most part they have annoying, colorful, modern-looking stickers on them that detract from what would otherwise be a perfect scene. If you look hard you can find one’s without them though. I struggled with composition in this room. When I took straight on shots using my widest angle (18mm) a lot of the straight lines of the drawers came out rounded and I hadn’t left enough room around the edges to fix the distortion in Photoshop and still be able to crop. The ¾ view, down the aisle, worked out OK for me though.
What to Bring
Lenses: I recommend bringing a lens (or a couple lenses) that can handle focal lengths from 11-135 mm for DX cameras or 18-200 mm for full frame cameras. I found that 18 mm didn’t offer a wide enough angle of view to take in the whole dome or some of the larger architectural features so when I went the second time I brought my Tokina 11-16 mm lens. The Tokina has a maximum aperture of f/2.8, which helped in composing shorten the time the shutter needed to stay open. The dim(ish) lighting in the room made it difficult to hold the camera still for three, non-blurry, bracketed shots that I could later merge to HDR. You can see some of my pictures have a certain, soft quality to them. On the other hand there is a lot of intricate detail in the statuses and other stone work. So you will want to have the ability to reach out and get pictures of those as well. Stabilization is going to be an issue though (see Tripod below). There is plenty of room and time to change out lenses but think through your order of pictures so you’re not changing back and forth.
Tripod: I recommend leaving the tripod at home (or in your hotel room). There is no room to set up a full tripod in and I’m sure if you tried to set one up you’d get shown the door. The room is filled with desks that are about the right height for you to rest your elbows on and brace yourself for the slightly longer shutter speed or longer focal length pictures. You may have to contort yourself into some weird positions though. You could also bring a tabletop tripod or a Gorillapod. These are great for operating in those places around DC that don’t allow full-sized tripods. Unfortunately, they are not helpful with taking shots at upward angles and there is a lot of that in the Reading Room.
Flash: An external flash won’t help much here. The ceilings are far too high to bounce the flash and people (including the staff) may get annoyed by the frequent flash popping. I recommend leaving the flash at home and using the on-camera flash if you need some impromptu fill light.
Filters: Leave them at home. As I mentioned earlier, while a circular polarizer may help with some reflections, be prepared to hold your camera still for over a second or pump your ISO way up.
Additional Resources
Library of Congress Visitors Page – Find out all the details I don’t mention here.
Library of Congress Reading Room Virtual Tour (Requires Silverlight) – Scope out the Reading Room before you get there.
Photographing Washington, DC – This book guided me through my first couple months in DC. It was one of many inspirations for this blog.
AB Pan Photography – You don’t have to take my word for it. Here is another DC photographer who also posts pictures of the Library of Congress.
Summary
What: Library of Congress Reading Room Open House
Where: Library of Congress, Jefferson Building
When: Columbus Day and Presidents Day, from 10 a.m. – 3 p.m.
—————————————————————————————–
Lens: Cover focal lengths DX: 11-135; FX: 18-200; Wide aperture is desirable
Tripod: Tabletop or Gorillapod may be useful
Flash: Leave it
Filters: Leave them
Bag: A small, shoulder bag is preferable
Pingback: Búsquedas en el nuevo catálogo integrado « Blog de la Biblioteca del IIE
Pingback: Library of Congress Main Reading Room Open House | Washington, DC | Eric Spiegel Photography
Pingback: No Photography Allowed « PhotoTourism DC
Pingback: Photographing the Library of Congress « PhotoTourism DC
Pingback: 2015 Oct. 12: Photo Opportunity – Photographing the Library of Congress Reading Room
Pingback: 2016 Feb. 15: Photo Opportunity – Photographing the Library of Congress Reading Room
Pingback: Top 5 Reasons That The Library of Congress Rocks – Wandering Jana
Pingback: No Photography Allowed | brandonkopp.com
Pingback: Photographing the Library of Congress | brandonkopp.com
Pingback: Photographing the Library of Congress | brandonkopp.com