I don’t remember when I came to the realization that many of the subjects in my photos (usually buildings or memorials) appeared to be leaning backward. It’s one of those things that you don’t realize is a problem until someone points it out to you, then you see it everywhere. I do remember sorting through my pictures thinking, “damn…that one’s doing it too” and then wondering what I could do about it.
The Problem: Converging vertical lines on buildings
Before we get at how best to tackle converging lines in photos, I think it’s helpful to have an understanding of how/why the problem commonly occurs. Let me give you a concrete example (and pardon the math).
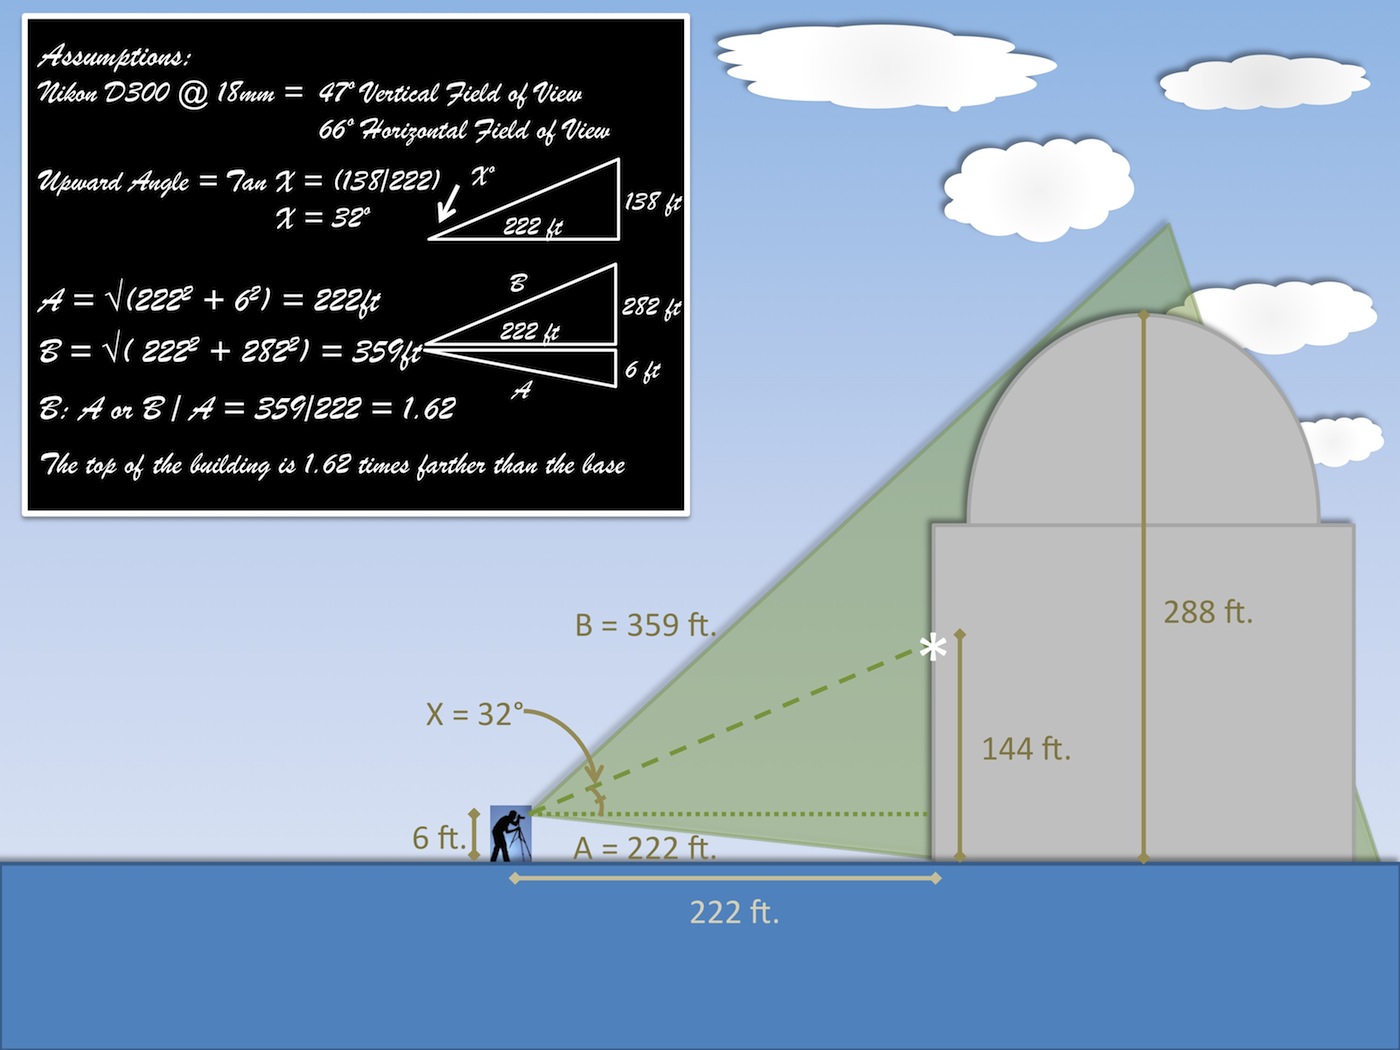
I’m walking by the U.S. Capitol Building with my Nikon D300. I suddenly get the urge to take a photo, so I turn and point my camera in a landscape orientation. Even at an 18mm focal length, I can’t fit the entire 288 ft. tall building into my photo (the Nikon D300 @ 18mm has a 47° Vertical Field of View). I turn my camera to a portrait orientation, where now it has a 66° Field of View. I have to lean back at a fairly sharp angle (32° relative to the ground) and point the camera about halfway up to get the whole building in the photo, but at least now it fits.
Through my eyes, the building looks like buildings are supposed to look, with all the walls perfectly vertical and parallel to one another. It isn’t until I get home and review my photos that I realize the walls do not appear parallel in the pictures I took. The problem is that, at 359 ft. away, the top of the building is 1.6 times farther away than the base (at 222 ft. away). This difference in the distance between the nearest and farthest portion of my subject and the angle of my camera’s image sensor relative to object I’m photographing leads to this distortion.

In photos, especially those taken at wider focal lengths, things that are closer to the lens appear larger, and things that are further away appear smaller. This includes different parts of the same object. So when you stand close to a subject like the Capitol Building and tilt the camera backward to get a shot, the base of the building is closer (and larger) than the top of the building; vertical lines that are supposed to be parallel now converge as they move upward in the photo. This is not just a problem for wide-angle lenses. It happens to a certain extent at all focal lengths, though the noticeable difference in size for near and far objects decreases exponentially as you zoom in.

The Solution(s)
As with other photography-related challenges, the solutions fall into one of three categories; buy new equipment, learn a new technique, or fix your photos after the fact using Photoshop. I’ll touch on each here.
Use a tilt-shift lens: The tilt-shift lens was made precisely for this situation. A special lens can be rotated so that your camera’s image sensor can remain parallel to the surface you are photographing. These lenses are very expensive and have a number of other drawbacks (e.g., manual focusing) so they are not for the casual or cash-strapped photographer. Luckily there are other, less expensive ways of dealing with this problem.

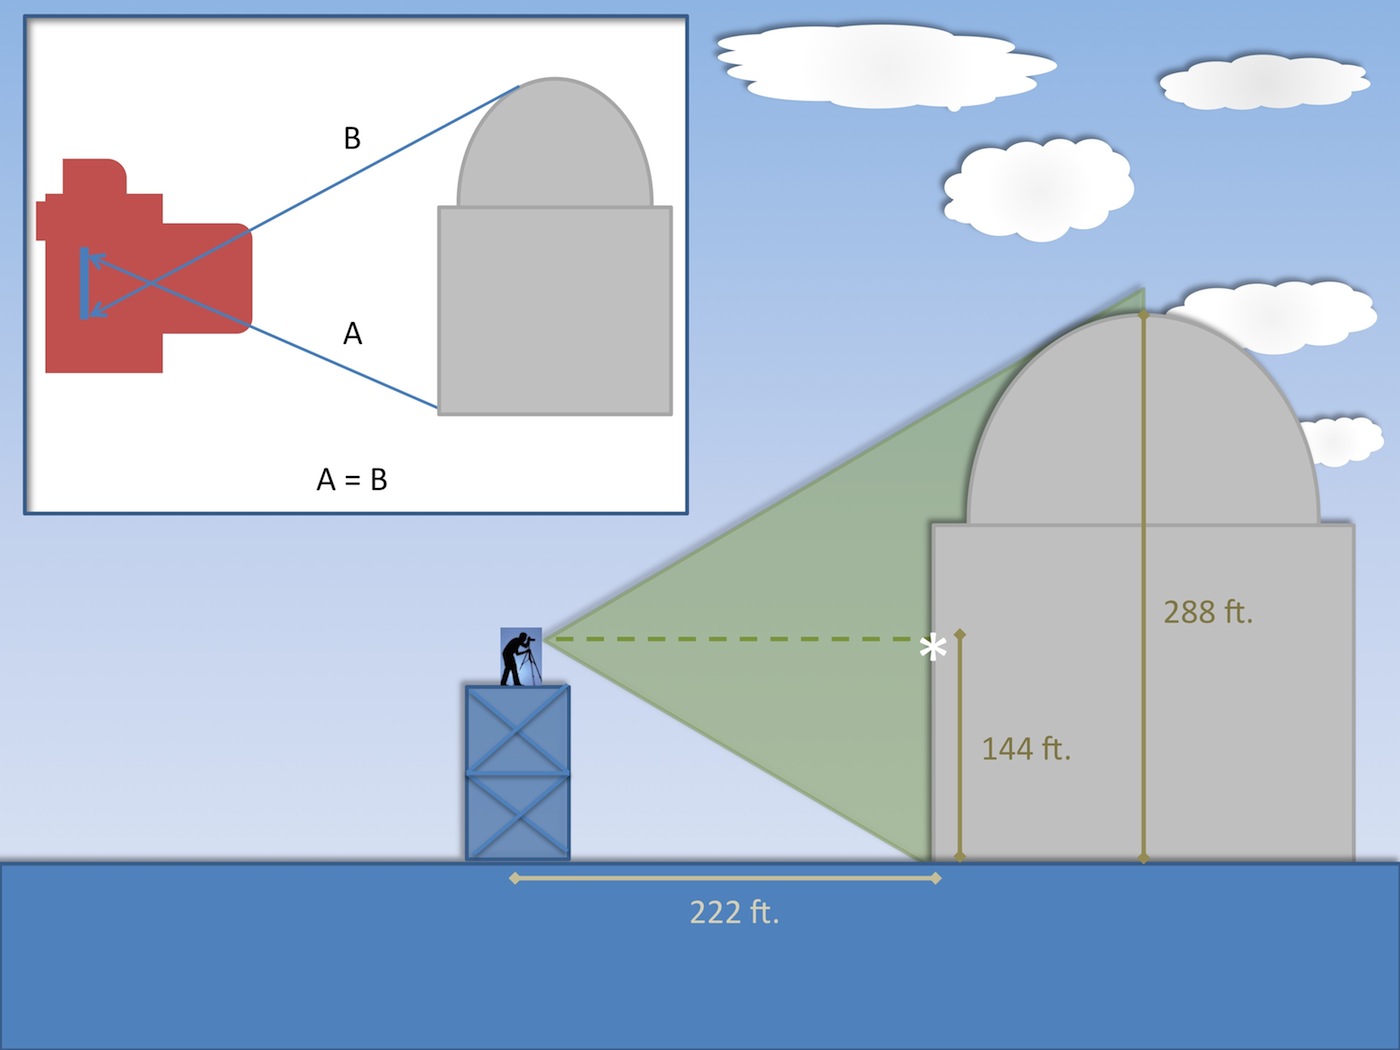
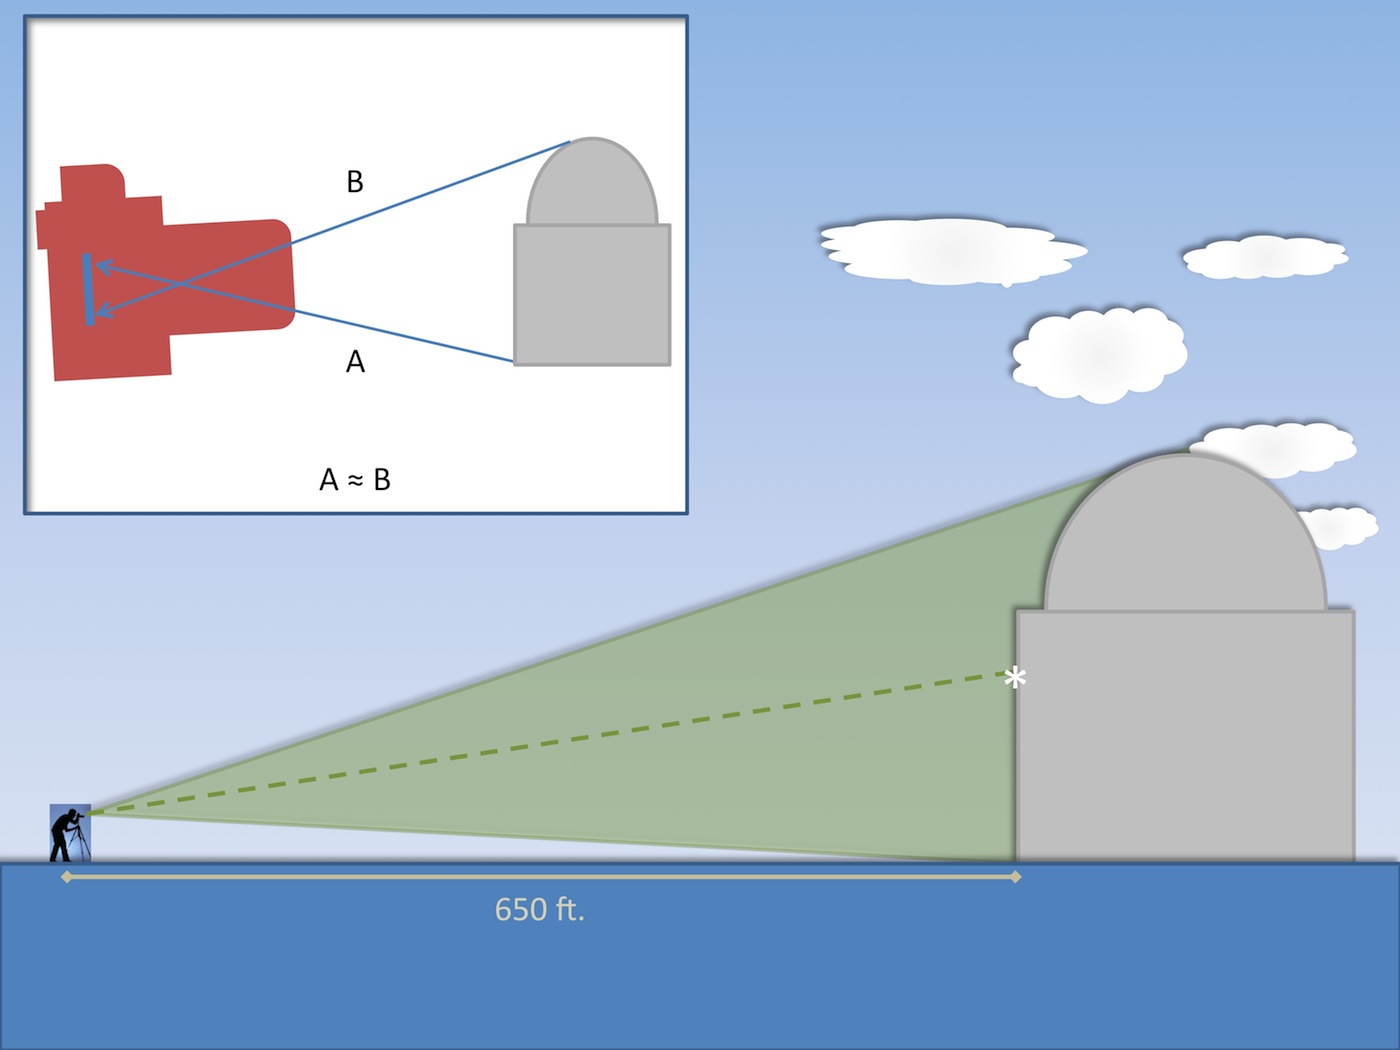
Fix your technique: The first thing you will want to think about is how you are composing your photo. The basic principle behind this solution is finding a way to take your photo so that your image sensor is perfectly vertical. Another way to think about this is to ensure the plane on which you’re taking your photo (the dotted line in the photo below) is parallel to the ground. To do this you can either (a) get up higher or (b) back up and zoom in.
-
- Get Higher – In order to get the same framing we had in our upward angled photo with a flat plane, we would need to be half as high as the object we’re trying to photograph. For a building like the U.S. Capitol, that would mean somehow finding our way 144 ft. in the air. The Capitol Police won’t even let you have a tripod, let along scaffolding. While this isn’t possible at the Capitol, you may find situations where, perhaps, you can go on the roof of a neighboring building or climb a hill to get in position.
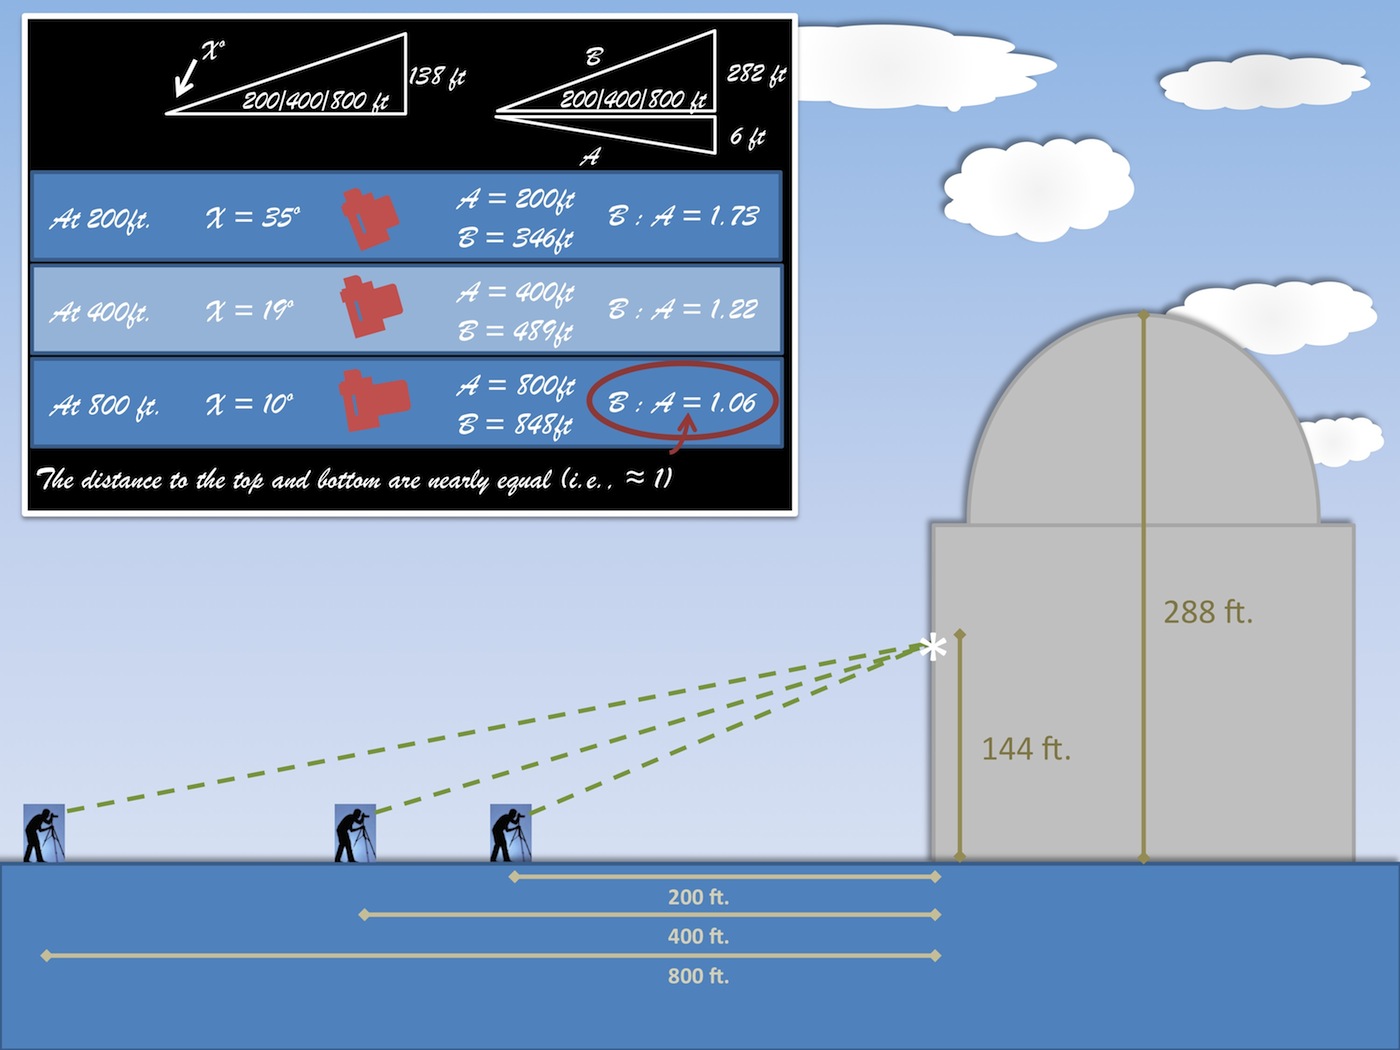
- Back Up – It is more practical to just back away from your subject. Every step you take away from the building, the less sharply angled your plane of aim is from the ground and the less difference in distance there will be between the bottom and the top of the building. In the example below, you can see that as we move out to 800 ft. from the base of the Capitol we only have to angle our camera at 10° (rather than 35° at 200 ft.). You can also see how the difference in distance between the top and bottom of the building shrinks drastically as we back up.
- Get Higher – In order to get the same framing we had in our upward angled photo with a flat plane, we would need to be half as high as the object we’re trying to photograph. For a building like the U.S. Capitol, that would mean somehow finding our way 144 ft. in the air. The Capitol Police won’t even let you have a tripod, let along scaffolding. While this isn’t possible at the Capitol, you may find situations where, perhaps, you can go on the roof of a neighboring building or climb a hill to get in position.
-
Zoom In – You’ll find that as you back away from your subject, if you maintain the same focal length, you’ll get a lot more foreground and background than you originally wanted. You can maintain your original composition by zooming in. Zooming in has the added benefit of making distant objects appear to grow in size more quickly than close objects (think of a photo of the moon behind a building at 50mm vs. 300mm). That is, as you zoom in, the difference in distance between the near and far pieces of your subject matters less.
Fix it in Photoshop
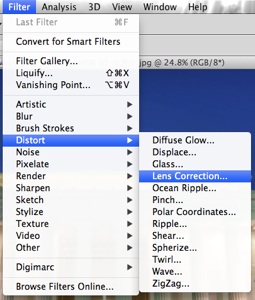
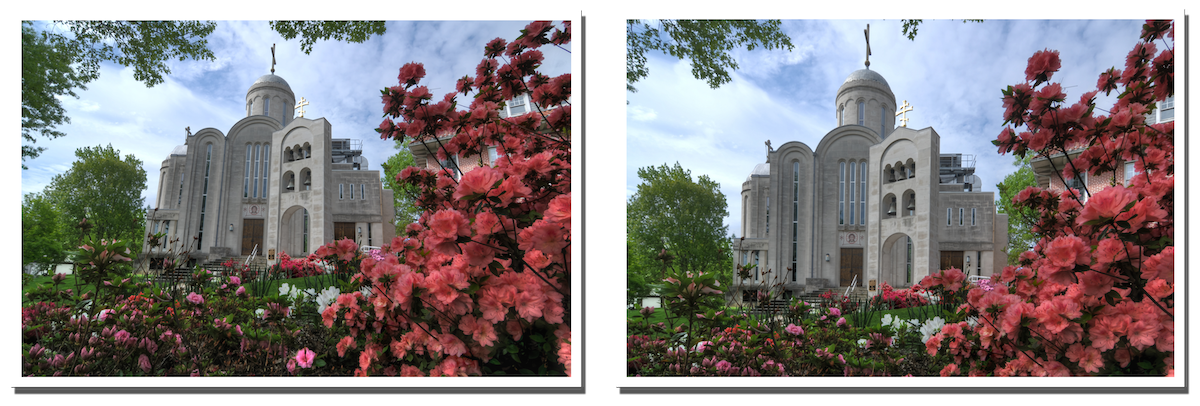
If all else fails, there’s Photoshop. I often find that it is impossible or impractical to move back and zoom in because (1) every step further back means more people in between me and my subject, (2) distracting elements (e.g., tree limbs) may invade the frame, (3) there may be physical limitations like fences, roads, or bodies of water, or (4) I may just be lazy. I was excited to discover the lens correction filter in Adobe Photoshop (I have Photoshop CS4, the following process may be different in other versions).
Workflow
- Frame and Take the Photo – In order to make the best use of this filter, it helps to think about how the filter will be applied when taking your photos. First, the filter works best when you take a straight-on composition. That is, you don’t want to be far off of the center line of what you are photographing. Also, when manipulating the photo you are going to lose objects at the edges, so be sure to include extra space at the margins of the photo that you are comfortable cropping off once the adjustments are made.

- Apply the Filter –
- Select Filter > Distort > Lens Correction – A dialogue box will open showing your photo criss-crossed with horizontal and vertical guide lines.
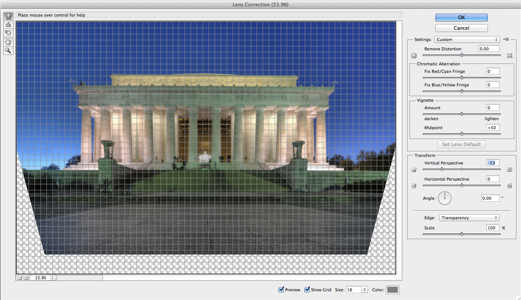
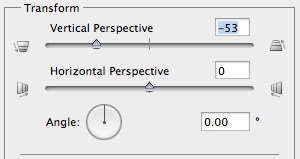
- Use the Vertical and Horizontal Perspective Sliders As Necessary – Adjust the orientation sliders until the vertical (and/or horizontal) lines on your subject match up with the guide lines. You can adjust the number of guide lines and zoom in as necessary.
- Use the Remove Distortion Slider As Necessary – If the lines in your photo that are supposed to be vertical are also bowed, you can adjust this setting to try and straighten them out.

- Crop Your Photo
- Click on the Crop Icon

- Select the Dimensions of Your Crop Box
- Select the Area You Wish to Crop

- Click on the Crop Icon
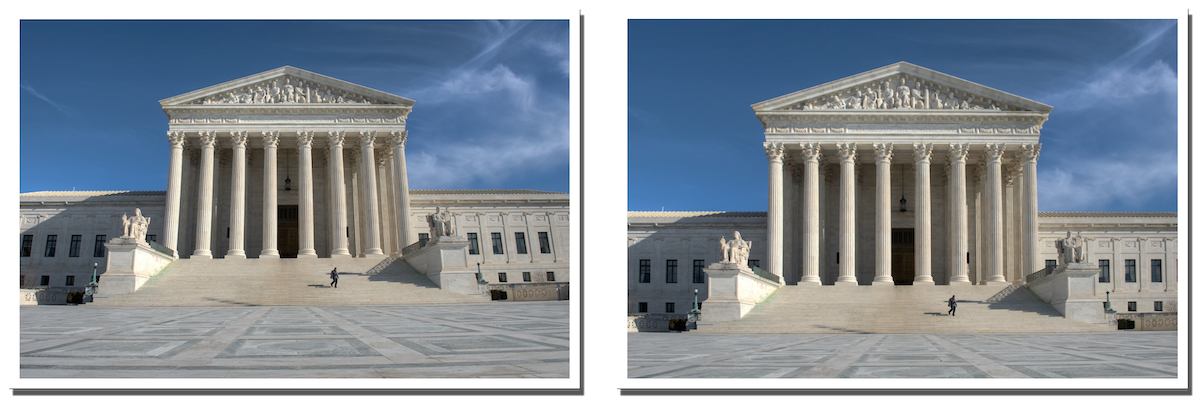
One last thing to keep in mind; the Lens Correction filter can have it’s drawbacks. Sometimes elements near the edges of the photos will look stretched or unnatural. This is especially likely if you use the filter to make extensive changes. Be sure you inspect your entire photo carefully after you’re done. You may be able to make some other corrections that fix the new problems that were created as a side effect of your last fix.
The Final Product

One Last Example
If you have any questions or comments about this article, let me know using my Contact page.
Pingback: Photographing the Washington Monument | brandonkopp.com
Pingback: Photographing the DC World War I Memorial | brandonkopp.com